
How to Build a First Battery Management System Circuit for a 1 Cell Lithium Battery
In this article, we show how to build a first battery management system circuit for a 1 cell lithium battery using a premade module.
Building a battery management system is a relatively complex task.
There are many things that go into a battery management system including knowing the cell chemistry of the battery cell you are using. There has to be a number of safety features in place, such as overcurrent protection, overvoltage protection, and temperature monitoring. Most systems will have some type of component to indicate that the device is currently charging and another component to indicate that the device is fully charged. More advanced battery systems will show you the percentage of life that the battery has and will update the increased percentage as the battery charges.
So there is a lot to battery management system circuits.
It requires a good amount of knowledge on the part of the engineer designing it.
Instead of just building your first from scratch, a good idea is to use a premade system, test it out, understand its workings, and then you can venture out to try your own.
A very popular premade module that you can find online on various sites, including amazon is the TP4056 Type-C USB 5V 1A 18650 Lithium Battery Charger Module Li-ion Charging Board TC4056A with Dual Protection Functions. One particular one that has sold well is the ALAMSCN brand. This can be found at the following link: TP4056 Lithium Battery Charger Module
This module is shown below.
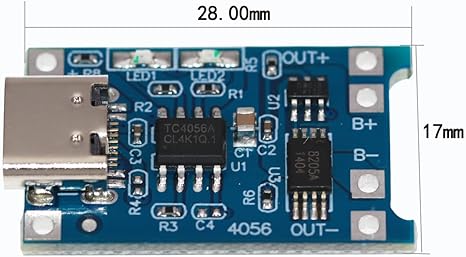
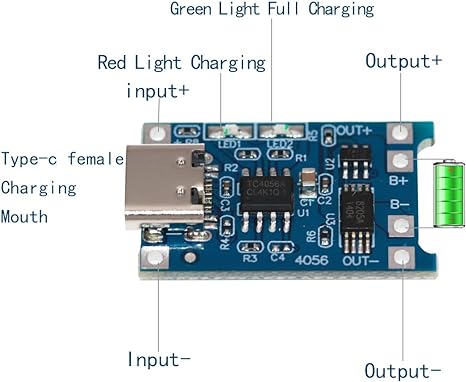
Below is the same module but with descriptions added to understand more of its functionality.
So you can see 4 electrical connections at the right side of the board.
The B+ is the positive terminal of the battery.
The B- is the negative terminal of the battery.
The Output + (at the very top) is the positive terminal of the output, which is the device that you're powering with this battery system.
The Output - is the negative terminal of the output.
Other than that, we have 2 electrical connections on the left side of the board.
These are the input electrical connections.
You have 2 choices.
You can either charge this device by the USB-C adapter or you can power it through another power source such as from a battery or DC power supply.
So this is where you can put that input voltage in.
You feed the positive DC voltage to Input +.
You feed the negative DC voltage to Input -.
So this is a summary of the electrical connections and functions of the components on the board.
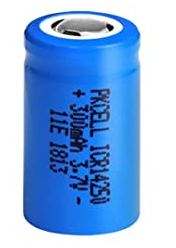
One thing that is very important to know in order to use this circuit properly is the battery that it charges is a 18650 lithium battery. This is a battery with a 3.7V nominal voltage. So this charging module is specific to the 18650 lithium battery (3.7V nominal voltage). It does not charge anything else such as 1.5V AA battery or a 9V D battery. It is for 18650 lithium batteries. So this is the battery you must use and which you must connect to the B+ and B- terminals.
If this is not the type of battery you are looking to charge, realize that this is just an experiment and to function as just a first battery management system. Once you learn the general operation, you can do adjustments so that your next system can be for what you want, whether it's 1.5V or 9V.
18650 lithium batteries are widely available online and can be easily obtained for a relatively inexpensive price.
The next thing that is important to know is the main chip that allows for this lithium battery charging device.
The main chip of this circuit is the TP4056 chip. This chip serves as the heart of this lithium charging module.
Thus, it deserves some key time looking at.
Because this is just a starter circuit and more than likely you eventually want to build your own battery charging system, you would look at the internal functioning of this board, starting with this TP4056 chip.
So let's do that.
The datasheet for the TP4056 chip can be found on this site at the following link: TP4056 1A Standalone Linear Lithium Ion Battery Charger with Thermal Regulation.
So this datasheet will give you a complete breakdown of the TP4056 chip, which can be used in standalone applications for charging a single lithium ion battery cell, specifically the 18650 lithium battery.
The datasheet gives the pinout and a circuit which gives the typical application of the chip.
This circuit is shown below.
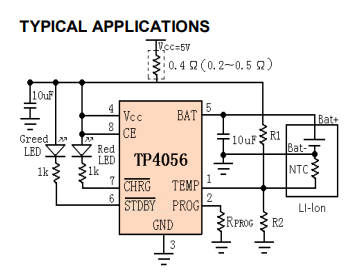
If you build a customized version of the circuit starting with the TP4056 chip, you can add your own customized features, such as whether there will be temperature sensing or not. You can also determine the constant charge current setting by choosing the appropriate resistor value. With this current, you determine the current that charges the battery. Thus, you can alter how fast a battery charges. The most current that the chip can supply is 1000mA or 1A. Thus, we can charge the 18650 lithium battery up to this 1A, which it can manage. Accordingt to the datasheet for the TP4056 chip, to charge at this current, we use a 1.2 ohm resistor connected to the PROG pin, which is pin 2.
If we want temperature sensing, we add a NTC thermistor to the TEMP pin, pin 1. This thermistor is connected to the battery. If the TEMP pin's voltage is below 45% or above 80% of the supply voltage VIN for more than 0.15s, this means that the battery's temperature is too high or too low and charging is suspended. The temperature is disabled by grounding the temperature pin.
Thus, if you are creating your own board, you can start with the TP4056 and get a good range more of customization.
However, starting with the premade board allows you to see how the charging should work and is easier, since it's already assembled.
All you must do is supply the battery and connect it to the board. Then you plug in the USB to the board to allow for the charging.
So this in a way allows for a first lithium battery charging circuit, which can serve as a stepping stone to build more advanced lithium battery systems in the future.
Related Resources