
How to Create a GridPane Layout in JavaFX

In this article, we show how to create a GridPane layout in JavaFX.
A GridPane layout allows us to lay out components to a layout like a grid.
We can add components by specifying the column and row that an item should be placed on a layout.
In our program below, we will create a GridPane layout for a login text field, a password text field, and a login button.
We will lay these out using the GridPane layout.
After laying out the components, it will look like the image at the following link: JavaFX GridPane Layout.
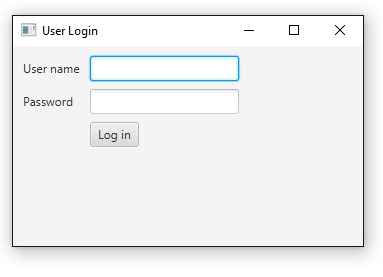
The full Java code to create this GridPane layout is shown below.
Below this code, we explain the code in full detail.
So the first thing we do, like in all JavaFX applications, is we import all the packages that are necessary for the code.
After this, we create a public class that extends the Application class. Therefore, the class that we make inherits all the functionality of the Application class.
We then overwrite the start() method. This is the method that is called automatically when we launch the program in the main method.
In this code, we set the stage to a title of "User Login".
We then create a Gridpane layout named grid. This is done through the statement, GridPane grid= new GridPane();
We then set padding to the GridPane layout because if we don't, it will be right against the border. This is how the window would be without any padding: JavaFX GridPane layout without padding. You can see its right up against the window. Padding gives some space to this, so that it isn't jammed right up against the window. Giving it padding makes it look nicer. The order is top/right/bottom/left.
Then we take the grid and we give vertical spacing among components through the setVgap() function. This gives space between rows, since rows are vertically aligned.
We then take the grid and give horizontal spacing among components through the setHgap() function. This gives space between columns, since columns are horizontally aligned.
Since we are creating a row for the the user name, we create a label called "User name".
For each component that you create in a GridPane, you must specify where it goes, so that we know where each component is situated.
How this is done is through the setConstraints() function. The setConstraints() function takes in 3 parameters. The first parameter is the item you want to specify the location of, the column, and the row.
Being that columns and rows begin at 0, we place the "User name" label in the column 0 and row 0.
Next, we create the text field for the user name. We place this horizontally right next to the "User name" label. So we place this in column 1, row 0.
We then create the password label, "Password". This is put under the user name label, so it goes in column 0, row 1.
Since the password text field is right beside horizontally, it goes in column 1, row 1.
We then create the login button. This is put right under the password text field, so it goes in column 1, row 2.
We then take the grid and add all the components to it.
We then create the scene, add the grid to it and specify the width and height of the scene.
We set the scene to the primary stage and show the scene.
In our main method, we launch the program.
And this is all that is required to create a GridPane layout in JavaFX.
Related Resources
How to Retrieve Data from a Text Field in JavaFX
How to Retrieve Data from a Radio Button Group in JavaFX
How to Retrieve Data from a Group of Check Boxes in JavaFX
How to Retrieve Data from a ChoiceBox in JavaFX
How to Retrieve Data from a ListView
How to Check if a Text Field is Empty in JavaFX
How to Select an Item By Default in JavaFX
How to Disable a Button After It's Clicked in JavaFX