
How to Build an HC-SR04 Distance Sensor Circuit
An ultrasonic distance sensor is a sensor that can measure distance from a solid or physical object.
An ultrasonic range finder does this through sound waves.
It sends out high-frequency sound waves and then waits to listen back for these sound waves. If it has heard back these sound waves, then this means the sound waves have bounced off of a physical object and has come back to the sensor, which means a physical object is present in front of the sensor. If it does not hear back these sound waves, this means that no physical object has been detected.
The ultrasonic sensor we will use is the very cheap and popular HC-SR04 sensor. We will integrate this sensor with an arduino for a very good object detection system.
We will write code so that if the sensor detects an object that is less than 3 inches from it, it will turn on and light up an LED.
The ultrasonic range finder can detect objects anywhere from 2cm (less than an inch) to 400 cm (157 inches or 13 feet).
There are actually 2 types of sensors that are widely used and very popular for measuring distance from a physical object- these are the infrared proximity sensor and the ultrasonic range finder.
This sensor has a measuring angle of 15°. This means the object must be between 15° of the front of the sensors. If outside this range, it will not detect it.
Ultrasonic range finders, in generals, have narrow measuring angles but wider ones do exist, so for your application, always check the datasheet of the sensor.
Components Needed
- HC-SR04 Ultrasonic Distance Sensor
- LED
- Arduino
The HC-SR04 Ultrasonic Distance Sensor is cheap, as said before. It can be gotten on ebay or many different online retailers for just over $1.
It runs on 5V of DC power and requires 2 of the Arduino's digital pins for connection.
The datasheet of the sensor can be found at the following link: HC-SR-4 Ultrasonic Distance Sensor Datasheet.
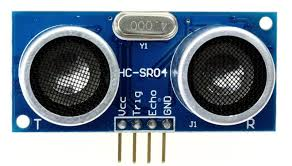
The sensor has 4 pins in total. 2 are power pins and 2 are digital pin connections.
The pinout for the HC-SR04 is shown below.
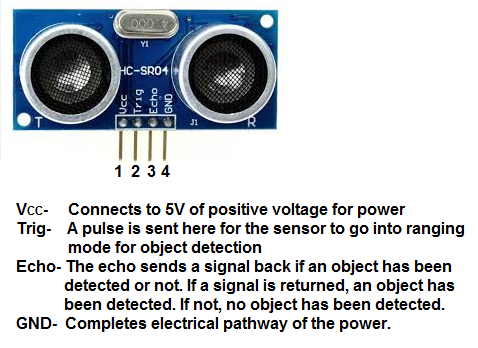
The power pins are VCC and GND. The ultrasonic range finder works on 5V of power. This is connected to VCC. GND is connected to ground.
The trigger (trig) pin is the pin needed to trigger or start the sensor into ranging mode. A 10-microsend pulse needs to be sent to the trigger pulse in order for the sensor to be triggered on. Without this pulse and the sensor will never go into ranging mode to detect objects. Therefore, this is a crucial pin for that reason. A pulse of at least 10 microseconds needs to be sent for the sensor to start detecting objects. When it receives this pulse, it sends out 8 40KHz pulses to detect an object and waits to listen back for these sound pulses.
The echo pin is the pin that sends the result of the sent out pulses. If the pulses have been received back, this means that the pulses bounced off of an object and came back to the
sensor, which means an object has been detected. The echo pin then returns the pulse representing the amount of time it took for the pulses to be
received back. With this time, we can compute the distance the object is from the sensor. If no object has been detected, the pulses are not received back, so the echo pin returns no pulse or a 0.
Ultrasonic Distance Sensor Circuit
The Ultrasonic Distance Sensor Circuit we will use to measure distance from
the object detected is shown below.

The circuit is very basic in connections.
The power pins are connected to the +5V and ground terminals of the arduino so that it can have sufficient power to operate.
Then the trigger pin is connected to pin 8, while the echo pin is connected to pin 7.
With this physical setup, all we need now is the code below.
Code
The code in order to detect objects a certain distance away is shown below.
const int signalPin= 7;
const int triggerPin= 8;
const int LEDPin= 13;
long signal, inches, centimeters;
void setup() {
Serial.begin(9600);
}
void loop() {
pinMode (signalPin, INPUT);
pinMode (triggerPin, OUTPUT);
pinMode (LEDPin, OUTPUT);
digitalWrite(triggerPin, LOW);
delayMicroseconds(2);
digitalWrite(triggerPin, HIGH);
delayMicroseconds(10);
digitalWrite(triggerPin, LOW);
signal= pulseIn(signalPin, HIGH);
//this is how we know it's an inch away
inches= signal/148;
centimeters= inches * 2.54;
Serial.print(inches);
Serial.print("in, ");
Serial.print(centimeters);
Serial.print("cm");
Serial.println();
delay(500);
if (inches < 3){
digitalWrite(LEDPin, HIGH);
delay(10000);
}
}
This code is very basic but accomplishes a lot.
The first block of code declares all of the variables that the code uses. The first 3 variables, on the first 3 lines, declare the pin connections to the arduino board. The signal pin, which is the pin that the ultrasonic range finder sends out to the arduino board connects to pin 7 of the arduino. The trigger Pin connects to pin 8. The LED connects to pin 13 on the arduino. The next variables, declared long, are are the signal (value itself), the inches in how far the object, and the centimeters of how far the object is away.
The next block of code, the setup() function, creates a Serial connection so that you can view the Serial monitor, which displays the data in inches and centimeters as to how far the physical object is that the sensor detects. Without this code, you wouldn't be able to see any print results.
The next block of code, the loop() function, is the code that is executed over and over again. Here, we make the signalPin an input. The signalPin carries the output signal from the ultrasonic range finder and inputs it into the arduino. This is why it is declared an input from the arduino perspective.
To trigger and start the range finder so that it starts sensing for physical objects, a 10-microsecond TTL pulse must be sent to the trigger pin. When this is done, the ultrasonic distance sensor goes into ranging mode to begin detecting objects. The sensor sends out sound wave pulses and waits to hear back for these pulses. If it does, it has detected an object. If not, then no object was detected.
The pulseIn() function reads a pulse. When set to high, it waits until the pin goes HIGH, starts timing, and then waits until the pin goes LOW. The function returns the length of the pulse in microseconds. It returns 0 if there is no pulse. It works on pulses from 10 microseconds to 3 minutes in length. The pulseIn() function can also take a third parameter, a timeout parameter. It is shown as follows: pulseIn(pin, value, timeout). With this timeout parameter, we can specify a value representing numerical time in which after this period of time has elapsed that we've specified, the pulse will give up and return a 0. So this is good to know if you only want the ultrasonic range finder to search for a period of time. If you're not interested in this, then it's not needed, which is why we don't use this parameter in this code.
Next, we calculate how far away the physical object that the sensor detects in inches. We calculate by the formula, inches= signal/148. This is because it takes 146 microseconds for an ultrasonic sensor to send a signal and read it back. In other words, if the ultrasonic sensor sends out a sound wave and receives it back 146 microseconds later, we know that the object is 1 inch away. If it returns the signal, for example, 700 microseconds later, then we know that the object is 700/148= 4.73 inches. It really takes 73.746 microseconds for the ultrasonic sensor to send out and reach an object one inch away. But this same signal has to then bounce back and reach the sensor. So the total time to read back the signal is approximately 148 microseconds. So you can see the gist of how ultrasonic sensors can measure distance. It's all about sending out high-frequency sound waves and the amount of time it takes for the sensor to read back that sound wave. Thus, the amount of time directly correlates with the distance of the object it is sensing.
Next, we convert the inches value into centimeters. This is just for those countries that use the metric system or are used to the metric system for distance values. Since the United States is one of the rare countries that uses a lot of non-metric values, centimeters would be more popular with the majority of the world. Since there are 2.54 centimeters in 1 inch, then we convert by taking the inches value and multiplying it by 2.54.
After this, we have a delay() function, which pretty much pauses the sensor for a while. In this case, we pause it for 500 milliseconds, which is a half a second. Then the sensor will resume after this. This is important depending on how frequent you want the sensor to test for object detection. If you don't want or frequent detection, you may have a long delay() of, say, 60000 milliseconds, which is a minute. But if you want frequent monitoring, 500 milliseconds is fine.
After this, our last block of code is the if statement. This now functions as our alert or alarm system. If an object is detected within a certain range, then we can trigger an output
such as in this case a red LED turning on when the distance detected of the object is less than 3 inches. Again, this is totally customizable. All you can do is to change the value.
And this is how ultrasonic range detectors work. It works very easily and seamless with an arduino. The connections are simple. The code is simple. And it's very useful for many
applications.
Related Resources
How to Build a Dark-activated Switch