
How to Activate a Virtual Environment for a Django Project in Linux

In this article, we show how to activate a virtual environment for a django project in linux.
Specifically in this article, we use the ubuntu linux operating system.
So setting up virtual environments are the standard when running django projects.
Virtual environments, as the name implies, creates an isolated environment from the rest of the computer. The project that you run in a virtual environment is isolated from the rest of the computer. The point of virtual environments is that for each project, you get to specify what django version you want to run, what numpy module version you want to run (if using numpy), what matplotlib version you want to run (if using matplotlib), etc.
Every time you create a virtual environment for a project, any module that you install you are only installing for that project specifically. You aren't installing the module for the entire computer.You are installing it only for that project. This makes you have complete control over what modules are run for a specific project.
For example, if the general computer is running Django 1.3, you can create a virtual environment for a project and then install django 1.9 for that project in the virtual environment. Now the general computer still has the same Django 1.3, but the project that you created now has django 1.9.
So this is the advantage of using virtual environments for Django projects.
So how do you activate a virtual environment for a django project?
Well, the first thing is install the virtual environment for the general computer. This is done using the line, pip install virtualenv
So this installs the virtual environment and gives us the ability to create a virtual environment for a certain django project.
And why do we need a virtual environment again?
So that we can have complete control and customization for the project. We can specify whatever version we want for whatever module and this is completely independent of what's installed for the general computer.
So now that we have virtual environment installed, what we have to do is go to the linux command terminal and go to the project folder that you want to create a virtual environment for.
So let's say you have a project called mywebsite. Obviously, this will be stored in the myproject directory.
So go to this directory using either the chdir function or the cd function and then type in the following line.
The line, virtualenv venv, will create a folder called venv. This allows for the activation of a virtual environment within the myproject directory.
However, the virtual environment isn't activated yet. So what we have to do to activate the virtual environment is to specify the line, source venv/bin/activate
This will actually activate the virtual environment, so now we're actually in a virtual environment for this project (myproject).
This is shown in a real-life linux command terminal below.
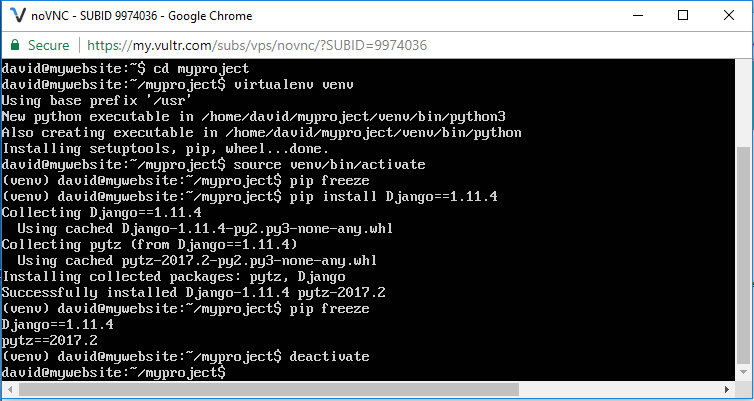
So above is a real-life creation of a virtual environment for a django project which is named myproject.
You can see we first have to go to the folder of the django project, in this case, myproject.
Once we're in the right folder in the terminal, we then create the virtual environment folder, venv. This is necessary to do in order to activate a virtual environment.
Next, we then activate the virtual environment using the statement, source venv/bin/activate.
If successful, you will see (venv) to the left of the command.
We are in the virtual environment for the project.
This means we are isolated to this project. That's what a virtual environment is.
Any module that we install in this virtual environment is only installed for this project and not for the whole system-wide computer.
I specified the command, pip freeze, in order to see what modules are installed for this virtual environment. And it returns nothing. This is because when you first create a virtual environment, it's empty. It has no modules installed in it. You have to install everything from scratch. This will django, maybe numpy, matplotlib, etc. But the great thing about a virtual environment is you have the freedom to specify any version of any module you want regardless of what's on your general computer.
So, in the example above, I installed django version 1.11.4.
My computer may be running something else, but this project has django version 1.11.4.
The isolated environment of a project is pretty amazing. And this is what virtual environments give.
Now I do pip freeze and you see the django module installed.
Again, virtual environments are the standard for running django projects.
It allows for complete control over a project.
And it allows for compatibility between various modules. Some modules only work for specific versions of Django. So it's very important to run the right version of a particular module for it to be compatible with other modules.
To deactivate the virtual environment and go back to the regular command prompt, all you have to do is specify, deactivate.
Then you will see the (venv) to the left of the command prompt disappear. This means we're out of the virtual environment for the project and now are operating within the general system-wide computer.
And this is how to activate a virtual environment for a django project in linux.
Related Resources
How to Randomly Select From or Shuffle a List in Python