
How to Add a Button to a Window Using JavaFX

In this article, we show how to add a button to a window using JavaFX.
To add a button to a window in JavaFX, we first must create a button.
The Java code to set the title of the window is shown below.
So in order to start a JavaFX application, you have to import several javafx packages. These include definitions of objects, functions, etc. that is needed to create a JavaFX application.
The class name that you choose must extend Application. Thus, the class inherits everything from the Application class. In this Application class is a broad range of functions and tools needed to create a JavaFX application.
Inside of this application is a method named start().
What we do in our code is we want to override this start() method. This way, we can create our own custom window in JavaFX. The start() method can be seen as the heart of the JavaFX application because it is inside of this method, we add in all the code needed for the JavaFX window.
This start() method takes in the parameter, primaryStage.
The primaryStage represents the window, essentially. So it represents the window object.
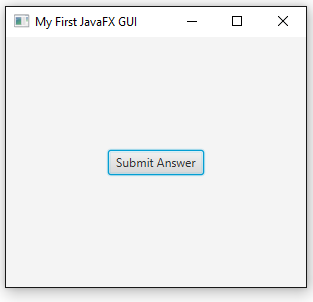
To add a title to this stage (window), we take primaryStage follow it with a dot and follow it with setTitle("My First JavaFX GUI"). This add the title, "My First JavaFX GUI" to the window.
We then create a button. JavaFX has a special class named Button. All we have to do is create an instance of this Button class; this produces a button. We pass into this Button variable the string we want on the button. In this case, I put "Submit Answer" on the button. You must pass something into the button, or else it will have nothing on it. You can either do at the time of instantiation or later you can use the setText() function to later set the value on the button.
The code below sets the value to the button to the same value as shown above.
So that is simply another way of doing the same thing.
We've now created a button but it isn't added to the stage yet.
Realize that every stage needs a scene. So in order to put this button on the stage, we first have to create a scene.
But even before we get to the scene, we have to create a layout so that we know where the button goes.
We create a layout by creating an instance of the StackPane class. We name of the instance, layout.
We then use the line, layout.getChildren().add(button);, to add the button the layout.
We then create a scene. The stage is primaryStage. We now need to add a scene to this stage. Remember that in all JavaFX applications, one stage and one scene is required.
We create a scene by making an instance of the Scene class. We name this object, scene1. Into this new object, we pass in the parameters, (layout, 300,250). The layout variable shows how the scene is laid out. The second parameter is the width, which we set to 300 in this example. The third parameter is the length, which we set to 250 in this example. Thus, we have a layout with a button added, with the window set to a width of 300px and a height of 250px.
We then use the setScene*) function to set the scene of the primaryStage to scene1. This lets us add the scene to the stage.
We then show the stage.
Running the code above gives us the following window: JavaFX Window with Button.
And this is what is required to add a button to a window using JavaFX.
Related Resources
How to Add a Title to a Window Using JavaFX