
How to Create a Delete View with Python in Django

In this article, we show how to create a delete view with Python in Django.
What is a delete view?
Let's start from the beginning.
Say we have a website that has a list of movies by genre.
Say this content is user-generated.
Users upload movie information such as titles, descriptions, year released, genre, etc.
If a user can upload movie information, the user should be able to delete something that s/he has uploaded.
Say a user uploads a movie, but then wants to delete the video s/he has uploaded.
We need to create a delete view.
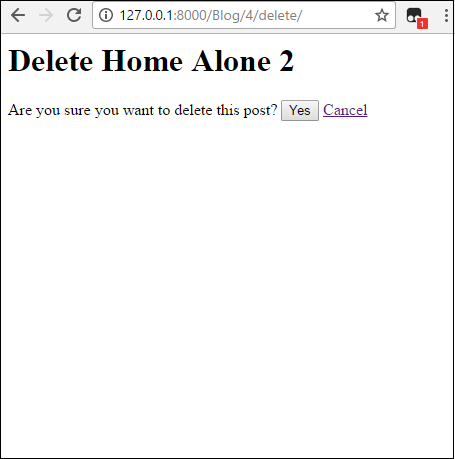
A delete view will have something such as, "Are you sure you want to delete this post?" And we'll have "Yes" or "Cancel" options.
This is a delete view.
You can parallel this to many other websites. Many websites have comments that users can write. If a user writes a comment, a user should be able to delete the comment. A user deciding to delete an object would be the equivalent to a delete view or at least a delete pop-up (such as if using Javascript).
Another parallel example is a website such as youtube. If a user uploads a video, the user can then delete a video, creating a delete view.
We've already shown how to create a list view and a detail view.
Now let's go into a delete view.
So let's see how this works in code.
models.py File
So below is the database table we will base our delete view from.
So we've created a database table called Movie which has 5 fields: user, title, genre, year_released, and description.
You don't really need to know much about the individual fields of this database for creating a delete view; however, know that the name of the
table is Movie.
views.py File
So now we go to our views.py file, which is where we do the deletion of the object that the user wants to delete.
So let's go through this code in the views.py file now.
So we just have to import everything we need.
Since we're rendering a delete view template file, we have to import render.
Since we are getting a specific object of a database table to delete, we use the built-in get_object_or_404 function in Django. This allows us to get a specific object from the database table that we can delete.
Since we are working with the Movie database table, we import Movie from models.py
Since we are going to use success messages in our code, we import messages from django.contrib
So after all imports, we define our function-based view, movies_delete_view(). We pass in the parameters, request, and the keyword argument, id=None.
So the first thing we do inside of the function and create a variable named movie, which we set equal to, get_object_or_404(Movie, id=id)
What this line does is it gets the id in the URL and passes it into this function. You'll see this in the urls.py file shown below. Basically, we have the delete page on, http://127.0.0.1:8000/Blog/id/delete/ where id is the id of the movie. So if dealing with the first movie object, then the URL is, http://127.0.0.1:8000/Blog/1/delete/
If we are dealing with the second Movie object, the URL is, http://127.0.0.1:8000/Blog/2/delete/
So, again, basically we just take this id from the URL and pass it into this get_object_or_404() function.
We then create a variable called creator and set it equal to, movie.user.username
What this variable contains is the username of the user who created the movie object being deleted.
The reason we want to know this is because we only want the user who created the post to be able to delete the post. Think of a website that contains user-generated content such as youtube. A user uploads videos to the site on his or her own account. You then don't want another coming on the site and deleting another user's content. Therefore, we want to make sure that the user who is currently logged in to the website is also the creator of the content. Only the creator of a content can delete content. Just like youtube, you can't have a user deleting another user's content.
In our next block of code, we create an if statement that if, request.method=="POST" and request.user.is_authenticated and request.username== creator, then we delete the object.
So this is a lot of stuff, so let's break it all down.
if request.method== POST is actually a refenrence to the form we will create in the delete view template. If the user clicks the "Yes" button when asked, "Are you sure you want to delete this post", this triggers the POST method in the form. Thus, request.method == POST will be true.
If request.user.is_authenticated checks to see if a user is an authenticated user. This technically isn't necessary but it's just another extra check.
if request.user.username== creator checks to see if the user who created the content is the same as the user who is deleting the content.
Again, to have only the content creators, and not other users, delete their content, you must check to see if the user who is currently logged in is the same person who is trying to delete.
We have other checks on top of this. You'll see them in the delete view template file.
If all these statements in the if statement are true, then we execute the code in the if statement.
We delete the movie object with the line, movie.delete()
We then create a success message, "Post successfully deleted!" which you will see we will post later in the page we redirect to, alerting them that the message was successfully deleted.
We then redirect the user to, http://127.0.0.1:8000/Blog/list
Here on this page, we print out the success message, "Post successfully deleted!" You'll see this later.
We then pass in the movie and creators variables into the context dictionary and pass the context dictionary into the movies-delete-view.html
template file.
urls.py File
So we have to specify the URL for the delete view template page.
So we go to the URLs page in the app, in this case, Blog.
We have the following in our urls.py file.
The delete view page will at the following URL, http://127.0.0.1:8000/Blog/id/delete/
And this is all that is needed for the urls.py file.
delete template file
Next we show the contents of the delete template file.
In this file, we do quite a number of things.
This is like a secret page, so to speak. And honestly, maybe Python isn't the best way of going about this. I think Javascript the better way of going about this, because Javascript has pop-up windows that isn't a URL a person can just access. But this will still work fine, but in a highly professional, you probably wouldn't want it this way. You'll see what I'm talking about.
So we have a delete template file.
In this file, we only want to present the option to delete the post to the user who created the content. To other users, we don't want to show them the delete option. Instead, if they get to the screen, which they can only do if they manually type in the URL by observing URL patterns, we want to just print out, "You cannot delete this Entry"
So let's go the contents of this file now, shown below.
So we have the HTML tag and the head tag.
At the beginning, in the template file, we have an if statement that if the currrent user is authenticated and the current user who is logged in is the same as the creator of the post, then we show the following contents.
We have an h1 tag that reads, Delete movie?
We then have a form with a method of "POST" and an action attribute of ""
To prevent cross-site request forgery, we put the following line in the form, {% csrf_token %}
We then ask the user, "Are you sure you want to delete this post?
We then have an input button that says, "Yes"
We then have an anchor tag that says, "Cancel", which we will bring a user back to the detail view.
We then close the form.
And we end the if statement. < pid="para1">If the current user who is logged in is not equal to the creator of the content, then you simply print out, "You cannot delete this entry" The user cannot get to this page, unless they manually type in the URL, http://127.0.0.1:8000/Blog/1/delete/
This is only if the user knows that this is how you access a delete page. The user should not be able to get to this page if s/he is not post creator, because of what we do in the detail page.
The output of this detail view is shown below.
detail view
Now we go to the detail view. This is the page, where we add a link so that a user can delete the page. But the user will only see this link if s/he is the user who created it. Other users will not see this link if s/he is not the creator of this post.
The contents of this detail view is shown below.
So at the bottom of the detail page, we put a link to delete this page. But this link will only appear if a user is currently logged in and the current user logged in is the creator of the post.
We send the user to the page, http://127.0.0.1:8000/Blog/id/delete/
list view
When a post is successfully deleted, the user gets redirected to the list of posts, with the success message presented, Post successfully deleted!
The contents of the list view is shown below.
In the list view, we print out the success message in the list view.
And this is all that is needed to create a delete view with Python in Django.
Related Resources
How to Insert Images into a Database Table with Python in Django
How to Insert Files into a Database Table with Python in Django
How to Insert Videos into a Database Table with Python in Django