
How to Create a Form in Django Using the Django Form Class

In this article, we show how to create a form in Django using the Django Form Class.
So, you're, of course, familiar with forms on the web, whether they be forms to register with a website, become a member, etc.
Of course, with django, you can use straight-up HTML to build forms using HTML tags. However, building forms using Django's built-in form class makes creating forms easier in ways.
Forms from Django provide validation. If you a user were to click on the 'Submit' button without filling in any of the forms, the form would not be submitted.
Django also provides many other types of validation. For example, if you want a user to submit his/her email, you can declare the field an EmailField in Django. This way, it has instant validation for email addresses. For example, if a user types in 'David' for his/her email, then Django will output that this is not an email.
So using forms from Django's built-in form class can make forms more professional and more easy to build than building it from scratch in HTML.
So, we'll now show how to build a form in Django using its built-in form class.
We'll build a simple form that asks a user for his/her first name, last name, email, username, and password.
This form will not be functional, but the first step is just to first know how to build a form.
So, let's build a new app, such as UserForm or UserInfo. I called my app, UserInfo, which will contain the form.
So, go through all the steps necessary to make this app functional, including putting the app in the INSTALLED_APPS list in the settings.py file, setting the path of the url in the urls.py file, making a urls.py file in the App, and creating a template in the App with the App name in the template directory (inside of this folder we will put our index.html template file). We will go through all of this. Just make sure that you set the path to the template in the DIRS list in the settings.py file, or else the template directory will not be found.
So, let's now get into the heart of our program.
The heart of this App is the form that we want the user to fill out.
Usually, when you create forms in Django, the place the form in its own file. If you have just one form in app, the usual convention is to call the form, forms.py.
So, it is in this forms.py file in the App that you created that you put the form.
So let's go over this forms.py file.
forms.py File
So, in the forms.py file, we place our form.
So, the following code below is the code to build a form that asks for the user's first name, last name, email, username, and password.
So, we'll now go over each line of this code.
So, it's very basic.
The first thing we have to do is import forms from Django. This is so that we can use the forms class.
The next thing we do is we create our form, which we call UserForm and inside of this form, we have to pass in forms.Form.
We then create each text field that we want to create.
Django has some hidden intelligence. When you specify first_name, when you actually have the form viewed on a web page, it will shown with the first word capitalized and any underscores replaced with a space. So first_name will show up on a web browser, as First name. So, keep that in mind.
So, we create the fields, first name, last name, email, username, password, and confirm password.
The fields, first_name and last_name, are of type CharField and are set to have a maximum length of 100 characters.
The field, email, is an EmailField. This means that Django automatically gives it email validation. This means that if a user types in a non-email address, such as 'David', it will not say this is not a valid email address. So that's a great validation tool in Django.
We create a username of type of CharField that has a maximum length of 20 characters.
We then create password and confirm_password textfields that are of type CharField and have maximum lengths of 100. The line, widget=forms.PasswordInput, makes Django know that this is a password textfield and that is should encrypt the characters from being shown on the screen.
So, this is our forms.py file.
We next will go to the views.py file in our App.
views.py File
We now go to views.py file.
The views.py file should always be seen as a completely necessary that you'll always have to use in order to render a template that ultimately will contain the page. However, the views.py file gets passed from all the Python code so that you pass on to a template.
The reason, you have a template is that it forms the frontend, composed of the HTML and CSS code. This is so that we have a page that shows all the frontend of the web page. We can then easily pass Python variables to this template, if we want to show Python code, which many times we want to do.
The views.py file is the main hub to get to the template file and it contains the raw Python code.
So, in the views.py file, we pass in the form that we created in the forms.py file and we render the template file that we will be working with.
So, this is the code in our views.py file.
So, in this file, we import render from django.shortcuts, so that we can render the template file we are using.
We then import the forms file in our current directory and import the Form that we need, which is UserForm.
We can then create a function called index and as always pass into it request.
We create a variable named form and pass into it the UserForm we created in the forms.py file.
We then form our context dictionary which is a dictionary that contains all of the variables that we want to pass into our template file.
We then render the template file, passing in all variables. Our template file in index.html.
We now go on to the index.html template file.
Template File- index.html
So we now go on to code our index.html template file.
This template file is located in the app we created in the Template/App_name Folder/
I created my App, UserInfo, so the template file is located in the Template/UserInfo/ directory.
In this template file, we simply create <form></form> tags and a submit button. In between we render the form we created.
This is the code in the file.
So, in this template file, we have our HTML tag, indicating that this is a HTML page.
We have a head tag, containing the title and some meta data.
We then have the body, which is the main part of our code.
So, in this body, we have our form.
Right now, the form is not functional, so we don't fill in all the necessary information such as the action attribute. We make the form of POST method because we don't want the data from the form appended to the URL; we want it sent to the server, so that it can processed.
We insert the line, {% csrf_token %}, as a security measure, so that it prevents cross site request forgery.
We then render the form that we created using Django's built-in form class.
Remember, we passed in the variable form from the views.py file, so that this is why you see form.
You see form.as_p, because, by default, with just forms, without as.p, the forms would be laid out horizontally, which you probably do not want. To have the elements of the form laid out vertically, you specify as.p.
We then add a Submit button to the form and then close the form.
This gives us a complete form, though we don't have it functional, but nontheless, it's complete.
So, upon running this code, we get the following output, shown below.
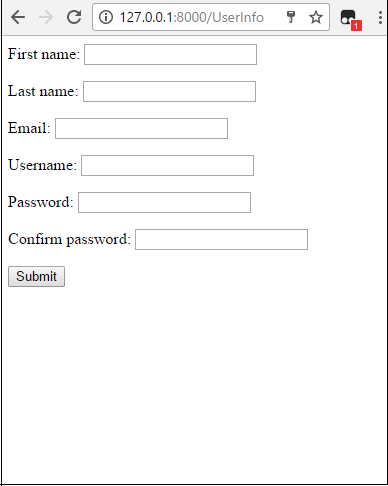
So, you see that you have a pretty decent web form displayed. If you were to press 'Submit' without any forms empty, it would not allow you to submit. If you try to submit the form, with the email address not valid, it will not let you submit.
So, this is the advantage of using Django's built-in forms to bulid a form instead of just
using plain HTML.
Related Resources
How to Randomly Select From or Shuffle a List in Python