
How to Create a Linux Character Device Driver with Multiple Devices
In this article, we show how to create a linux character device driver with multiple devices.
Not every time you create a device driver will it always be for a single character device.
You may want to create a character device driver that manages multiple devices. For example, it may be a character device driver that has multiple sensors that are used for different purposes. For example, you may connect a character device driver that uses ADC sensors to record data in the front of the device, 2 for each of the sides and one for the back. In this case, you would have 4 ADC sensors, sensor 1, sensor 2, sensor 3, and sensor 4.
In this program, we will create a character device that creates and manages pseudo character devices.
This means we won't use any actual hardware devices.
We will create pseudo character devices in software only. This way, you can see how a character device driver works without actually needing any hardware devices.
We will replicate in software simple memory buffer devices, which will function as our character devices.
Okay, so we start.
The first thing that you want to do is create a directory on your computer where you will store your device drivers.
This can be in any directory.
I created mine my home directory on my linux operating system.
On the home directory, I created the pcdm.c file (which is the character device driver source code) in the /custom_drivers/character_drivers/multipledevs directory.
You are free to create this wherever you want (you can do exactly as I have done).
Within this directory, you need 2 files.
The first is a Makefile, which will act to build our character device driver source code. You can download or check out this file at the following link: Makefile for Pseudo Character Device Driver
The next file that is necessary is the source code for the pseudo character device driver.
To create this file, go to the linux terminal and type in, touch pcdm.c
This creates a file, pcdm.c
Now go into this file such as by using vim with the line, vim pcdm.c
So below is the full code for this character device.
You can copy and paste this code into the pcdm.c file and if you build it with
make, you should see that it should work correctly.
Though this code may seem long and at least somewhat intimidating, it really isn't, and we'll now go through it to facilitate you understanding it.
So the first few lines are necessary headers that you need in order to run various functions throughout the code. Otherwise, there would be multiple errors if they are not included.
We then define the memory sizes of our pseudo character devices. Remember, these are devices that are created in software to represent memory device buffers.
We make the first device to be 1024 bytes through the line, #define DEV1_MEM_SIZE 1024
We make the second device to be 512 bytes through the line, #define DEV2_MEM_SIZE 512
We make the third device to be 1024 bytes through the line, #define DEV3_MEM_SIZE 1024
We make the fourth device to be 512 bytes through the line, #define DEV4_MEM_SIZE 512
We then define the macro, NO_OF_DEVICES and set this macro equal to 4, since we have 4 character devices.
We no go on to actually creating our character memory device buffers.
We create our first character device through the line, char device_buffer_dev1[DEV1_MEM_SIZE];
We create our second character device through the line, char device_buffer_dev2[DEV2_MEM_SIZE];
We create our third character device through the line, char device_buffer_dev3[DEV3_MEM_SIZE];
We create our fourth character device through the line, char device_buffer_dev4[DEV4_MEM_SIZE];
Next, we define a few macros, RDONLY, WRONLY, and RDWR that determine the positions that each character device will have.
If a character device has RDONLY (read only) permissions, then a user can only read from the file (but cannot write to the file).
If a character device has WRONLY (write only) permissions, then a user can write to the file (but cannot read from it).
If a character device has RDWR (read write) permissions), then a user can read from or write to the file.
We set these permissions to each of the character devices in the driver private data structure.
Next, we have our structure definition for the pcd device private data structure.
This includes the buffer, the size of the data, the serial number, the permission, and the cdev object.
This establishes the structure for each character device private data.
Next, we have our structure definition for the pcd driver private data structure.
This includes the total number of devices, the device number (the major number of the device, not the minor), the device class, the device creation, and the private data for each of the devices (held in pcdev_data[num]).
Next, we create a structure from the pcdrv_private_data structure named pcdrv_data, which will hold the actual device information for each of our character devices.
The total number of devices is NO_OF_DEVICES
The device_number, device class, and device creation are not handled here, because those are all created later in code in our init function.
What we do here, though, is initialize each of the character devices with the buffer, the data size, the serial number, and the permissions.
After this, we then move on to the file operation methods.
The first file operation we create is the lseek() method.
We create a structure, *pcdev_data, which we set equal to, filp->private_data
This gives us access to all the private data of each of the character devices.
We then create an integer, max_size, which holds the data size of the device.
The current file position can always be obtained through, filp->f_pos
We then have a switch statement that checks to determine the whence value and performs error checking.
Next, we go to our read file operation method.
Just like with the lseek method, we create a structure *pcdev_data of type pcdev_private_data
We use the adjust the count if it is greater than the size of the character buffer device.
We then use the copy_to_user() function to perform the read operation.
The first parameter, buff, is the destination of the read operation. This is the user buffer.
The second parameter, pcdev_data->buffer+(*f_pos), is source of the read operation, or where we are reading from. To read from the character device driver, we needs its buffer address, along with the current file position to determine where the read operation starts from.
The third parameter, count, determines how many bytes we read.
As always, we then update the file pointer.
Next, we create our write file operation method.
We create our *pcdev_data structure from the pcdev_private_data structure.
We then adjust the count if necessary.
To carry out the write file operation method, we use the copy_from_user() function.
The first parameter, pcdev_data->buffer+(*f_pos), is the destination of our write operation. We want to write to the device. buffer represents the address to our character device. *f_pos represents the position on the device where we begin writing to.
The second parameter, buff, is the source of our write operation.
The third parameter, count, is the number of bytes that we write.
Next, we create a function, check_permission(), which we use in the open file operation method.
dev_permission represents the permission of the device, whether RDWR, RDONLY, or WRONLY.
acc_mode represents the access mode that the user opens the file with. A user can try to open a file with read access only, write access only, or read-write access. If the user opens the file with read-write access for a file that has RDWR access mode, this is OK. However, a user should not be granted read access to a file with write only permission or given write access to a file with read only permissions. So this is a function to check for this and we later put this function into the open file operation method, since the open method is where access modes are checked against the file's given permission.
We use if statements to make sure that RDONLY does not enable writing and that WRONLY does not enable reading.
We then create our open file operation method.
We create an integer variable named minor_n.
We then create a structure named pcdev_data, which is of type pcdev_private_data. We will use this structure to access the private data of our character devices.
In order to access the private data of a device, we can obtain this information from inode.
In the inode structure, there is a field called *i_cdev, which is of type cdev structure. This pointer holds the device of our device cdev structure. We take the help of this pointer to access a device's private data.
How is this done?
There is a macro, container_of, that allows us to get the container element for a member of a structure.
With, inode->i_cdev, we get the pointer that represents the cdev structure within our pcdev_private_data structure. Within our pcev_private_data structure, there is a field named, struct cdev cdev
What we want is access to this entire pcdev_private_data structure, so that we can access all of the elements of a device's private data (such as its buffer, size, serial number, and permission).
The container_of macro returns the container of this cdev structure, which is the pcdev_private_structure.
The container_of macro takes in 3 parameters.
The first parameter is the pointer to the member. This is, inode->i_cdev
The second parameter is the type of the container struct that the cdev structure is embedded in. In our case, the structure is, struct pcdev_private_data
The third parameter is the name of the member within the structure. In our case, this is, cdev
We set this function equal to, pcdev_data
Now, the next line is very important, which is, filp->private_data = pcdev_data;
This line saves the private data of the open file to the pcdev_data
This is important because as you may know, when a file is opened, it remains open throughout the entire interaction that a user continues with it until the user closes the file, in which case the file is closed or released.
We save the private data to the pcdev_data pointer variable, so that we can use it in other file operation methods such as read and write, which you saw previously.
We save this data to the file structure, filp, using the line, filp->private_data
Notice how all the different file operation methods have a parameter, struct file *filp
This includes the read, write, lseek file operation methods, as well as the open and release methods.
Since they all have this in common, and since the file stays open throughout the duration of a program (unless it is explicitly closed or released), any information saved to the file structure is available to all other methods, since they have that parameter in common and the file structure, again, stays open once it is opened with the open method.
Since we save the pcdev_data that we created to, filp->private_data = pcdev_data;
The file structure now has each device's private data
Notice, in each of the file operation methods for the read, write and lseek methods, there is the line, struct pcdev_private_data *pcdev_data = (struct pcdev_private_data*)filp->private_data;
This creates an instance of the pcdev_private_data named pcdev_data and sets it equal to, filp->private_data
Now for each device that is open, we can get its private data.
Next, we check the access mode that the user requests to have for a device against the device's given permission. A user should not have write access to a device with read only permission or given read access to a device with write only permission.
If the access mode that the user requests is permissible given the device's permission, the open file method is successfully executed.
The release or close file operation is much simpler. It doesn't change from a single character device.
We then specify all of our file operations in the pcd_fops structure, along with the owner.
Lastly, we have our pcd_driver_init() function.
The first thing that we do is dynamically allocate a device number to our character devices. This is done through the line, ret= alloc_chrdev_region(&pcdrv_data.device_number, 0,NO_OF_DEVICES,"pcdevs");
Since we have 4 devices, we will dynamically generate 4 device numbers. All the devices will have the same major number but different minor numbers starting with 0 and sequentially going up from there.
Next, we create a device class with the line, pcdrv_data.class_pcd= class_create(THIS_MODULE,"pcd_class");
This creates a device class under the /sys/class/ directory.
Next, we need to initialize each cdev structure with the file operation methods (fops), set the owner for each of the cdev structures, register each device (cdev structure) with the virtual file system, and then perform the device creation (populate the sysfs with device information).
Even though this can be done manually with all the devices, it's much more efficient to do this through a for loop. So this is what we do.
The goto statements that you see at the bottom of this function are just in case there are any errors, those actions are taken.
We lastly have our pcd_driver_cleanup() function.
When we are exiting this driver, we need to make sure that we destroy each device, delete each cdev structure, destory the class, and unregister the devices from the VFS.
Now if you build this module with the statement, make host, you should see that there are no errors.
You should get an output such as that shown below.
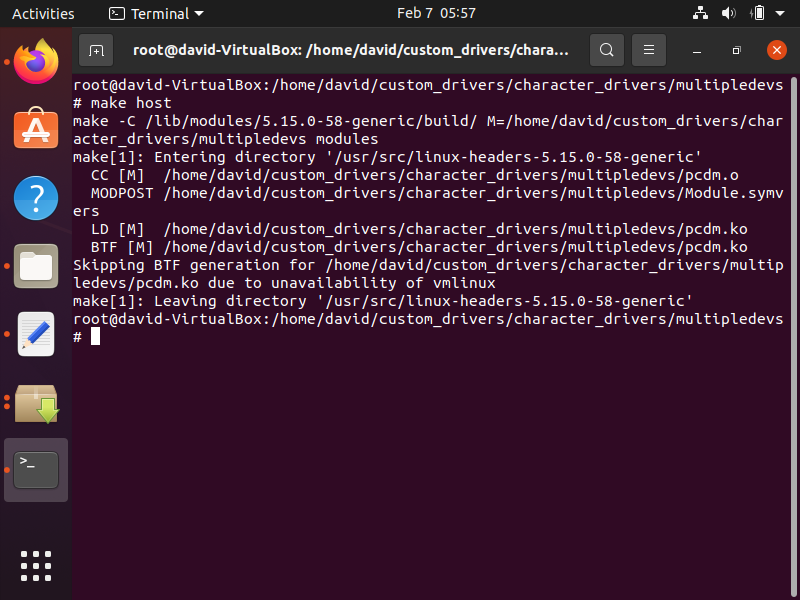
So our module has been built successfully without any errors.
We now insert the module into our linux kernel with the statement, insmod pcdm.o
This is shown below.

Now we run the statement, dmesg | tail
This gives us the output as shown below.
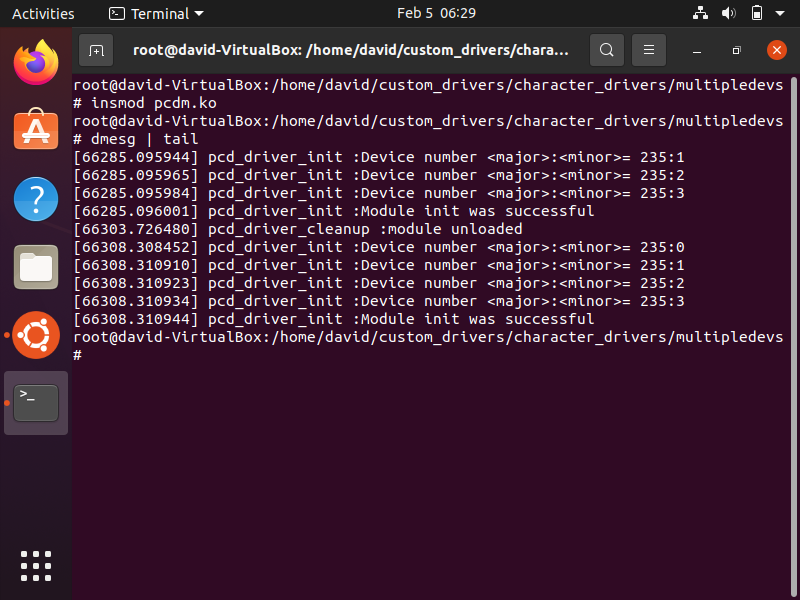
So you can see the output of our program and the assigned numbers that each of the character devices have.
You can see that they all have the same major number, 235
You can see, though, that they differ in the minor number.
The first device has a minor number of 0, the second has a minor number of 1, the third has a minor number of 2, and the fourth has a minor number of 3.
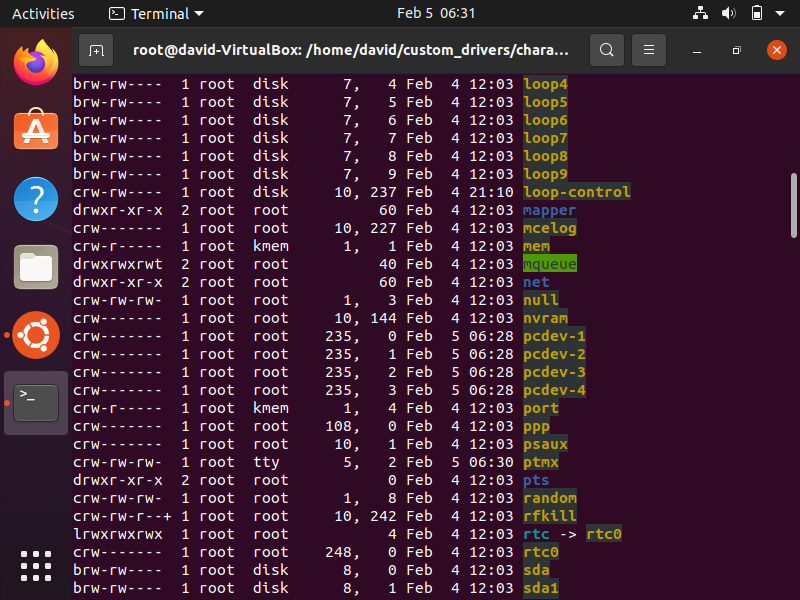
If we check the /dev/ directory, we should see all of these character devices present.
So we cd into this directory and run the statement, ls -l
If you scroll down the list, you should see the devices, pcdev-1, pcdev-2, pcdev-3, and pcdev-4.
This is shown below.
So there you have it.
We have successfully created a linux character device that creates multiple devices.
The next step is now to test your character device driver with the file operation methods which we created to make sure
they work correctly.
Related Resources