How to Create a Linux Kernel Module and Run it On a Local and Target Host Device
In this article, we will show how to create a linux kernel module.
We will create a simple Hello World linux kernel module, as a starter.
In later articles, we will create more advanced linux kernel modules.
We show how to run this linux kernel module on a local host device (the computer you are using to create the module) and a target host device (such as a microcomputer board, such as a beaglebone board or raspberry pi).
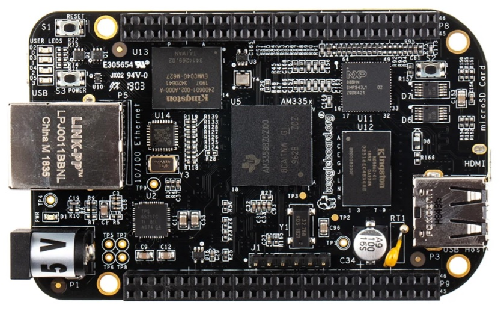
Specifically, the target host device we will use in our example is a beaglebone black board.
So the first step in creating a linux kernel module is to already have the linux source code downloaded. This can be done by either downloading directly to your computer or using a method such as git to download the linux source code.
Know that a linux kernel module is simply an addition to a linux kernel. Therefore, you must have the linux kernel first and then you create modules that go with the kernel.
So to get the linux kernel source code on your computer, make sure that you have git installed on your computer. This can be obtained through, sudo apt-get install git
Once you have this, run the following command below.
This will download a directory named linux in the directory you ran this command.
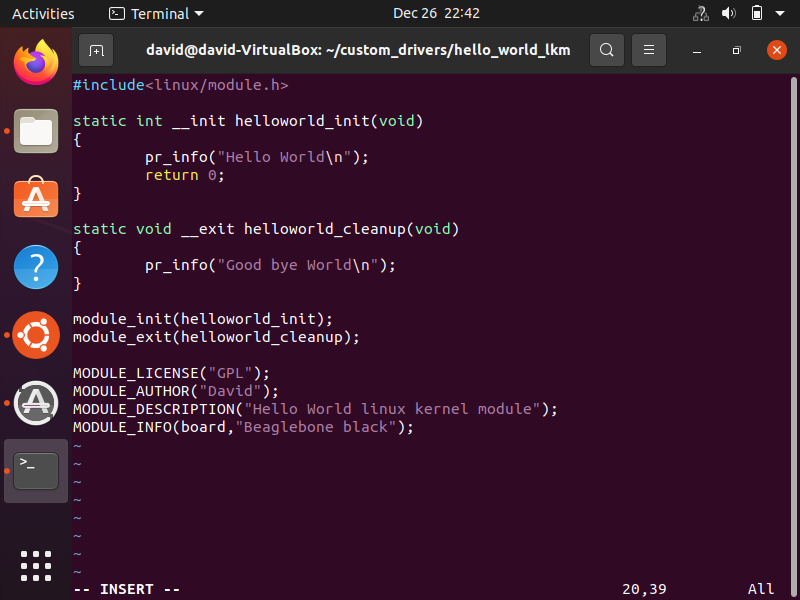
Next, we have the following code representing our Hello World linux kernel module.
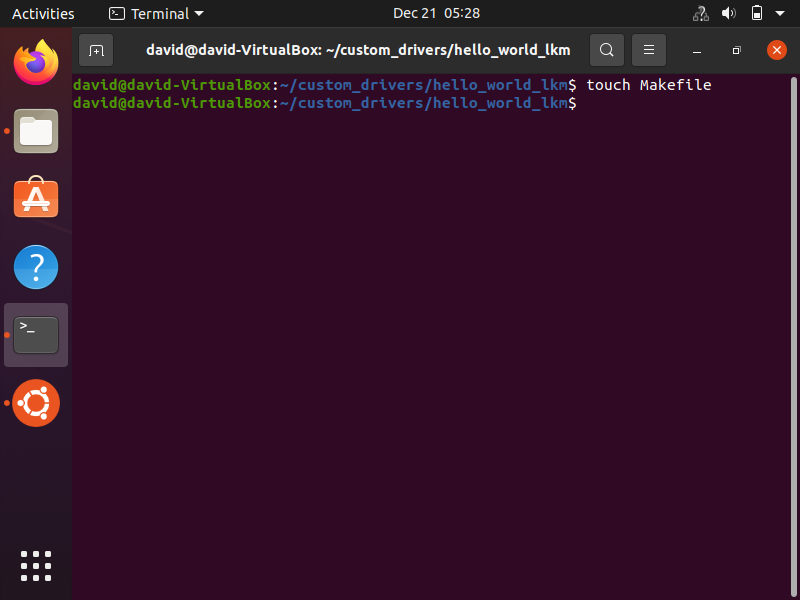
So what you can do is create a directory on your computer apart from the linux source code directory. What we are doing is creating a local directory with the local main.c file, which contains the helloworld linux kernel module.
So whatever directory you create on your local computer, go within this directory in the terminal and then
enter in the command below.
This will create a file, where you can then enter in the source code for the hello world linux kernel module.
This source code is shown below.
#include This hello world linux kernel source code is shown below within the linux terminal.
Let's now break down the code, so that you have an understanding of it.
The first part of this code is the header.
This is the part which has the include statement.
Every kernel module should have the header included above.
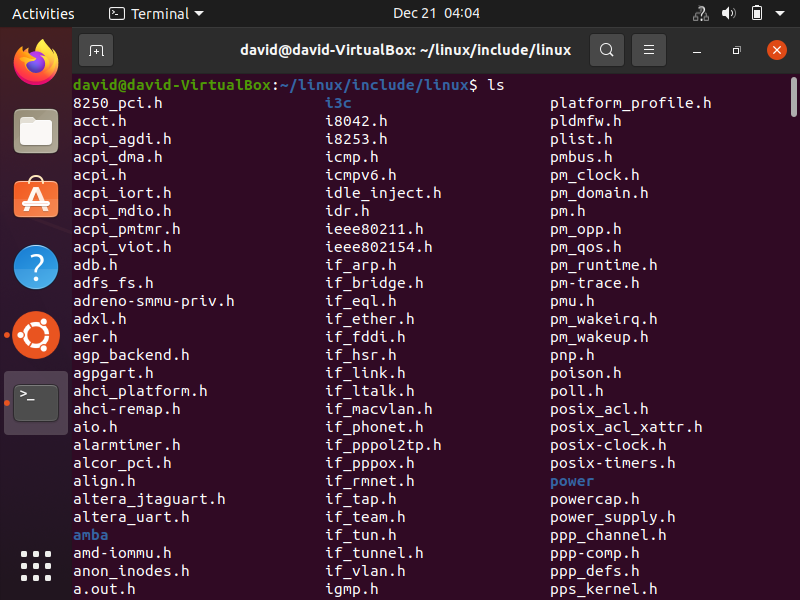
You can find all the header files within the linux kernel source code /include/linux directory.
This is shown below.
Also know that we are writing this code for the kernel, so this is a kernel header.
The module clean-up function is run when the module is removed.
The __init function section attribute is a compiler directive, which directs the compiler to keep data or code in an output section called ".init"
The __exit function section attribute is a compiler directive, which directs the compiler to keep data or code in an output section called ".exit"
Next we have the registration of the entry points.
module_init() and module_exit() are macros used to register your module's init function and clean-up function with the kernel.
module_init() and module_exit() are not functions, but macros which are defined in include/linux/module.h
module_init() will add its parameter to the init entry point database of the kernel
module_exit() will add its parameter to exit entry point database of the kernel
The last section of the code is the module description.
This offers descriptive information about the module.
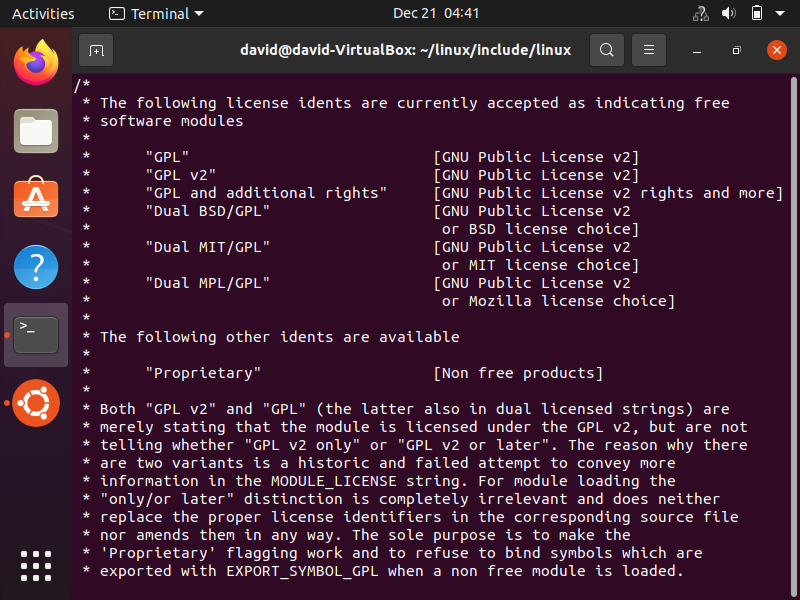
MODULE_LICENSE is a macro used by the kernel module to annouce its license type.
If you load a module whose license parameter is non-GPL(General Public License), then the kernel triggers a warning of being tainted. This is its way of letting the users
and developers know it's a non-free license based module.
You can go to the include/linux/module.h file to find out what are the allowed parameters
which can be used with this macro to load the module without tainting the kernel.
If you use go to this file using the module.h file in the path,
include/linux/module.h, using the vi command, you can see all the different types of license types
for linux kernel modules.
This is shown below.
In our example, though, we will be using, "GPL".
So now we have our kernel module.
The kernel module must then be built.
Kernel modules can be built in 2 ways, either statically linked against the kernel image
or dynamically loadable.
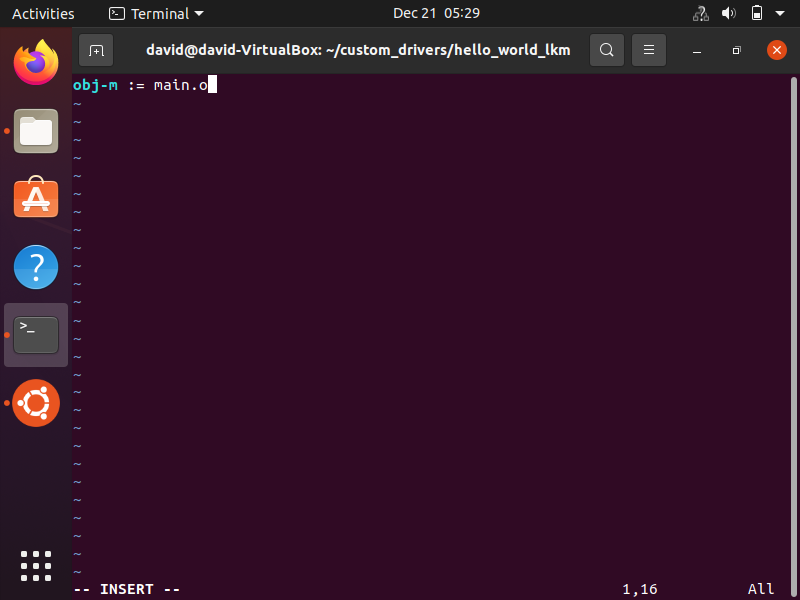
In order to build the linux kernel module, we have to create a Makefile, which then allows us to build
the kernel module.
So within the same local directory that you created, enter in the following command below.
This is shown below.
We will put very basic code within this Makefile.
All you have to do is add in the code below.
This is shown below.
This Makefile will allow us to build the linux kernel module either for the local host (on our own computer)
or the target host (on a beaglebone device).
You see above that we placed 'm' after obj-
When you state 'm', this makes the module compile as a dynamically loadable kernel module.
If you state 'y', this makes the module compile linked with the kernel image. In other words, it will be
statically linked with the module.
If you state 'n', the module is not compiled.
With this code, the kbuild system will build main.o from main.c and after linking will create in the kernel
module main.ko file.
To build a kernel module (out of tree), the general format to do this is shown below.
The $KDIR is the directory where the kernel source is located plus the build directory.
By default, this will be at,
/lib/modules/ M=$PWD informs kbuild that an external module is being built. "M" is the absolute path of the
directory where the external module (kbuild) file is located.
[Targets] represents the action that you want to perform.
This can be any of 4 values, which we will discuss in depth now below, including modules, modules_install, clean, and
help.
modules is the keyword that allows us to build modules. This is simply the compilation of the module build process.
Afterwards, we must use modules_install, to actually place the built module on our computer. The default location
is /lib/modules/ clean is the keyword that allows us to erase all files related to the module building process, so that we can
begin once again with a clean slate. This removes all generated files in the module directory only.
help is the keyword that allows us to get resources to aid us in the process.
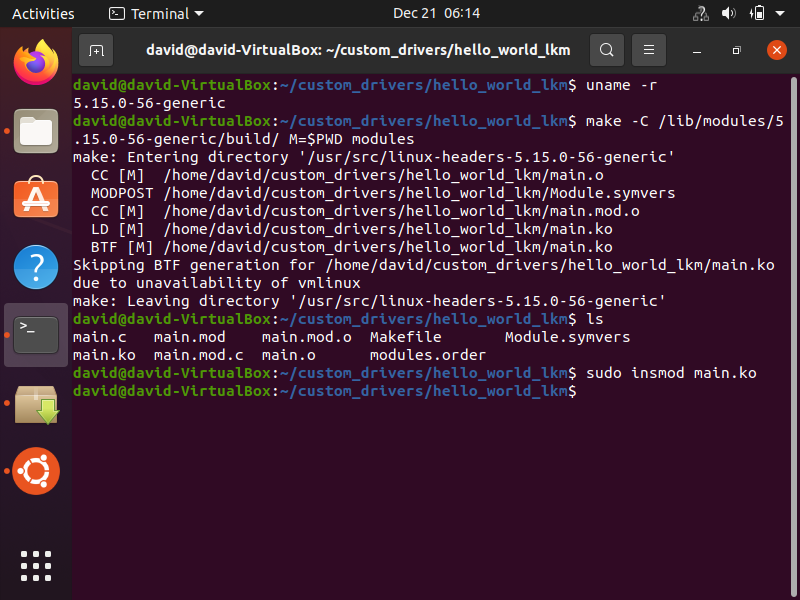
So now let's go back to the directory where you built the hello world linux kernel module.
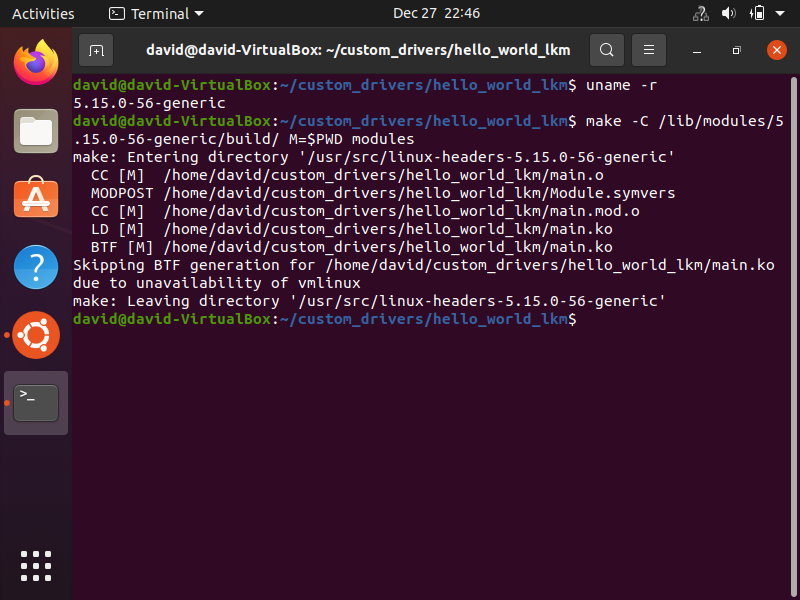
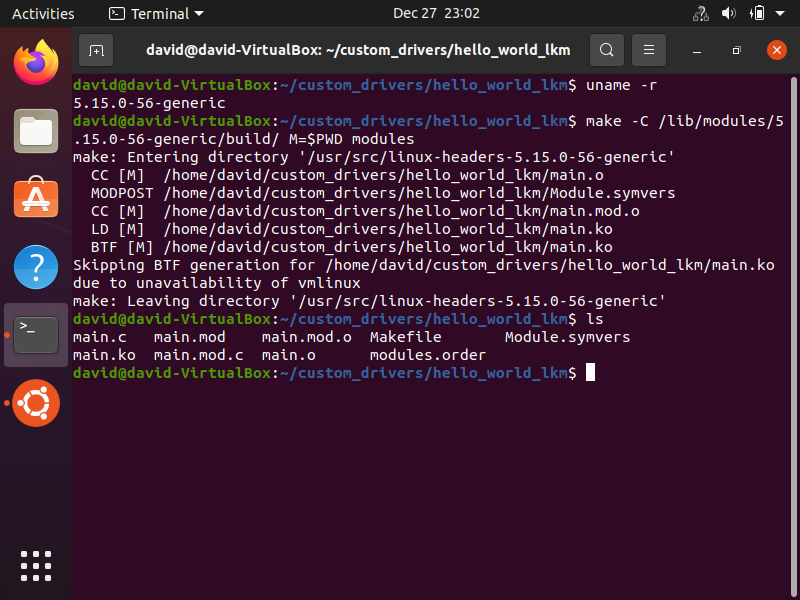
To find the current version of the linux kernel that is running on your host, type in command shown below.
This command can be done in any directory in the linux terminal.
This is shown below.
This is important because in order to build with Make, we have to specify the full path, which includes the
linux kernel location.
So our full code to do this would be that as shown below.
This is shown below.
So what this code does is it builds the hello world linux kernel module based on the linux kernel version of the
host PC. As we saw, this linux kernel version in my example above is, 5.15.0-56-generic
Linux kernel modules are always built against a specific linux kernel; therefore, you can see why we had to specify
the path to the linux kernel source code on our local computer. Modules are specific to linux kernel versions.
So after we have run this command, a number of files will be created from this build process.
If you ls into this directory, we see all the files created during this build process.
The most important of these files that we'll use is the main.ko file, which is the kernel module.
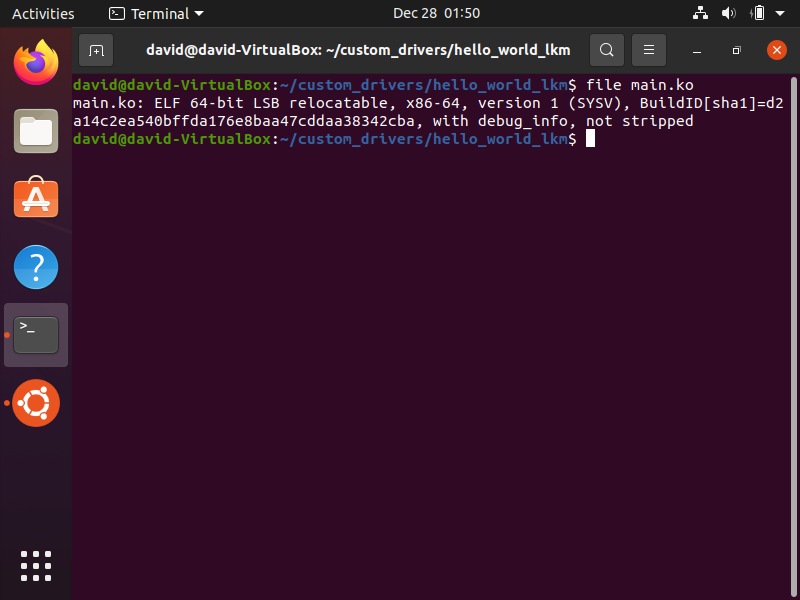
We can learn all about this file through the command below.
You can see that this main.ko linux kernel module is for a 64-bit linux operating system that is of type
x86-64.
This is important because as we'll see later, we can build linux kernel modules for all types of devices, whether
linux operating systems running on a computer or linux operating systems running on microcomputers such as beaglebone devices.
So now we're at the point where we have compiled the module.
Remember this module is a dynamically loadable kernel module. So it will only run when we insert it into the running
kernel.
This can be done with the insmod command.
The full code to do this is shown below.
This is shown below.
So now we've inserted the module into the running kernel on our computer.
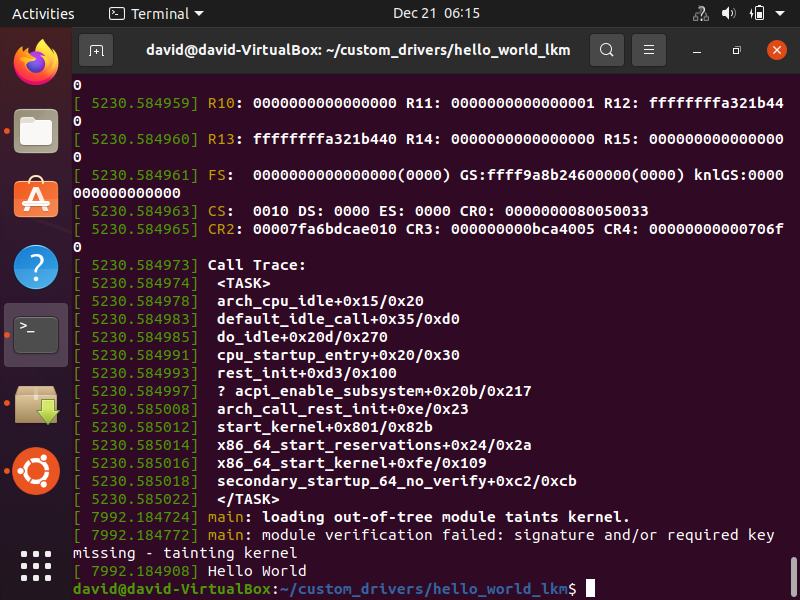
Now to see the result of this insertion of the module, simply enter in the command below.
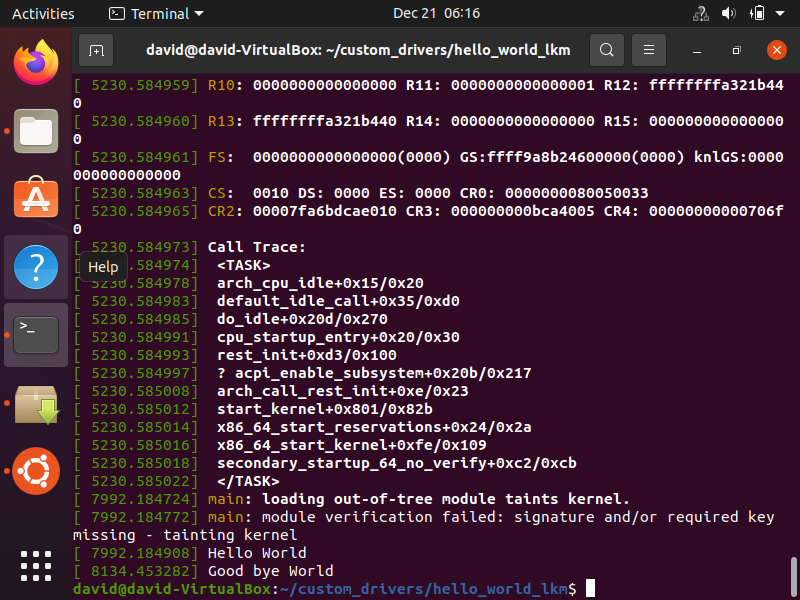
This will show the "Hello World" message, as seen below.
So, above, you see the Hello World output from the module.
Above that, you see the message, "loading out-of-tree module taints kernel" and "module verification failed:
signature and/or required key missing- tainting kernel"
This occurs because we're loading an out-of-tree kernel module. It is simply a warning and it does not affect
the operation of the module or the kernel. If the module was an in-tree module, you would not get this message.
You get the message, "module verification failed:signature and/or required key missing- tainting kernel"
because the vendor, in this case, Ubuntu turned on module signature verification. Since our kernel module does not have a
signature, it fails. This again is simply a warning message.
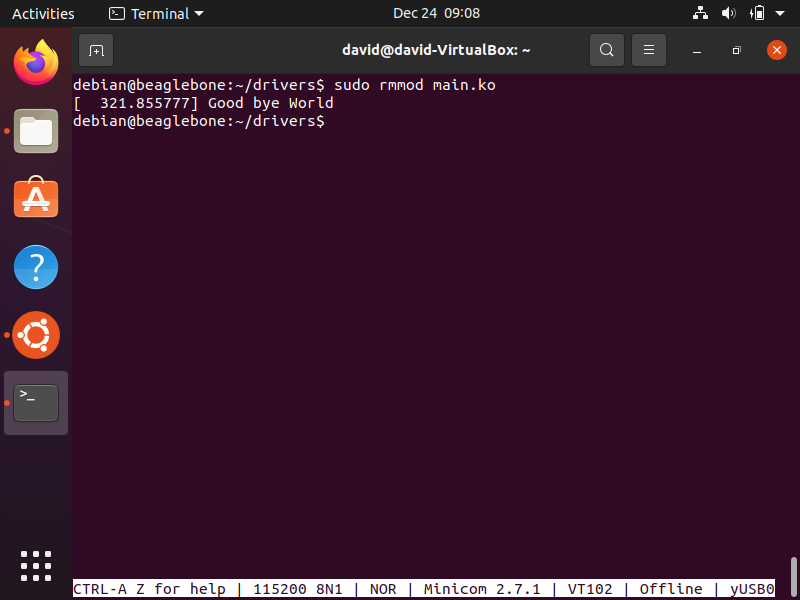
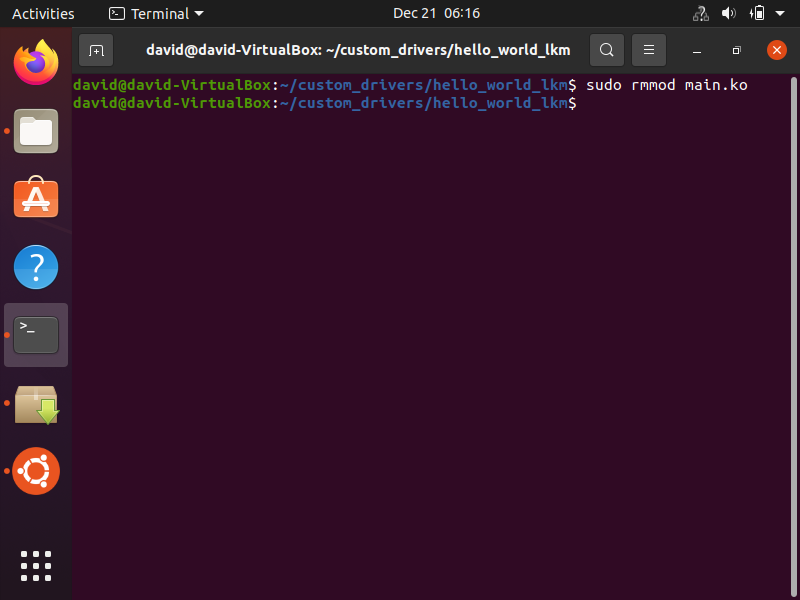
Next, we will show what happens when we remove the module from the running kernel.
This is done using the rmmod command.
The full code to do this is shown below.
This is shown below.
To see the output of this code, we again use dmesg, which produces the output shown below.
So this is how to run a module on a local host.
But we can also do the same on a target host, such as a beaglebone device.
So let's now go over how to do this.
So we will now go over how to run the linux kernel module on a target device, in this case a beaglebone black
board.
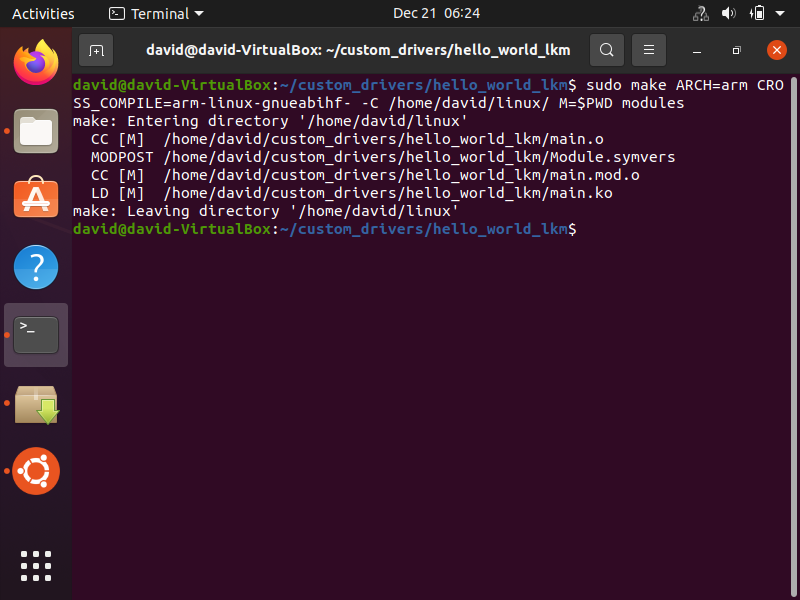
The code to build the module is a little different.
Before running this code, you should clean the directory using the clean command, which will erase all files
within the modules directory except for main.c and Makefile.
To build a kernel module (out of tree), the general format to do this is shown below.
The path to the pre-built linux kernel source code for the beaglebone black on my system is, /home/david/linux/
Therefore, the full code is shown below.
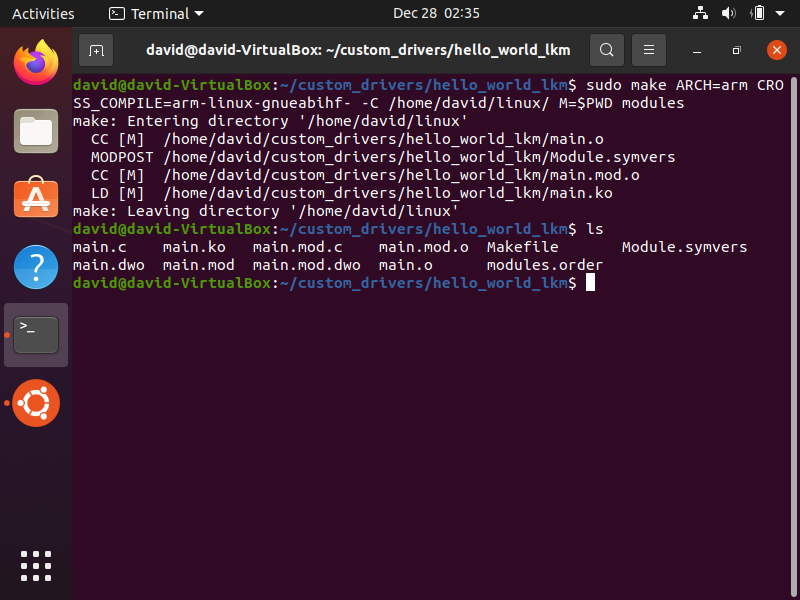
If you then run the ls command, you will see all the files within this folder, except this time they are for
use with your target host, not for the local host.
This is shown below.
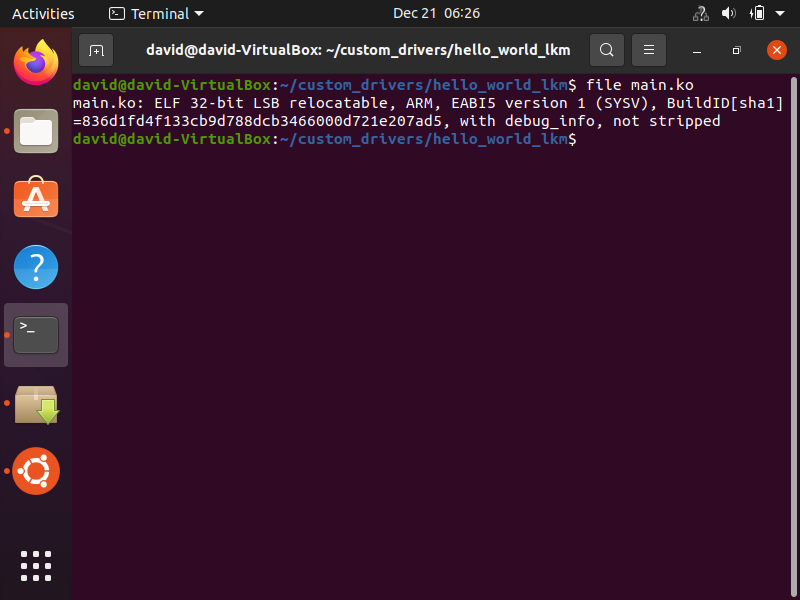
The file we are most concerned with is the main.ko file, which, again, is the linux kernel module file.
If we run the file command on this main.ko file now, we see it is different than before when we were running
it on the local host.
This is shown below.
So now we look at the output of this file command and see how it contrasts with before when we built the linux kernel module for the local host.
This linux kernel file is for a linux operating system with an ARM architecture.
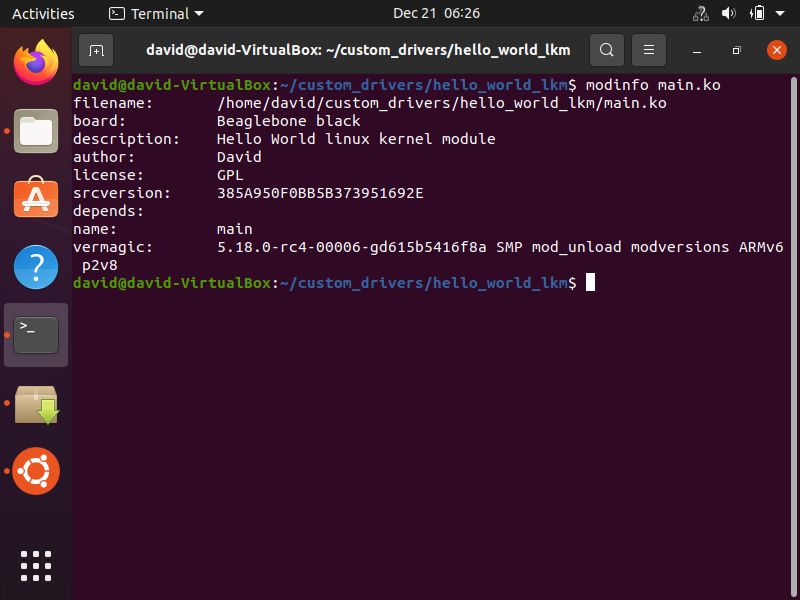
We can also harness information using the modinfo command, as shown below.
With the modinfo command, we can see the version of the linux kernel that this module is made for and see that
it is intended for an ARMv6 device.
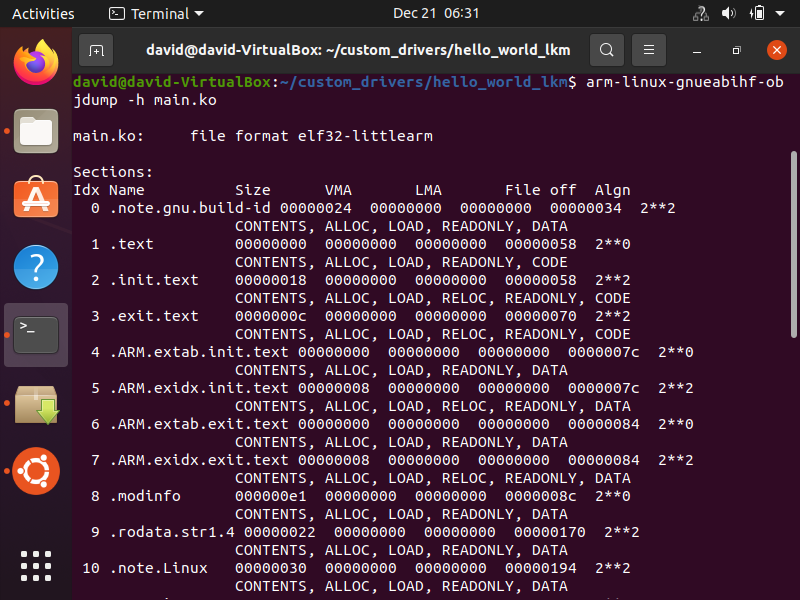
We also can harness information using the objdump command, as shown below.
With the objdump command, we can see that the main.ko file is an elf32-littlearm
We can also see that data is stored within the init.text and exit.text areas of memory.
So the next thing we now have to do is connect our device to the computer, which in this case is a beaglebone
black board.
You want to use minicom in order to boot the board.
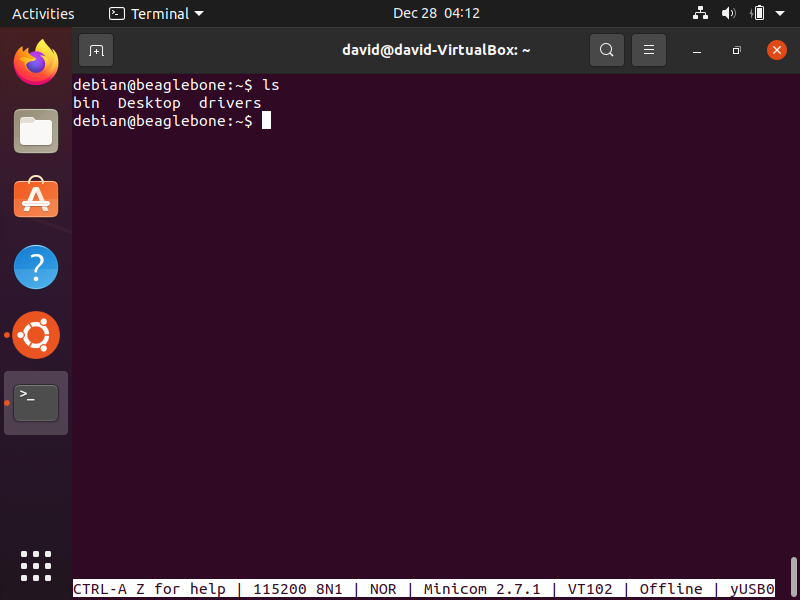
Log in to the operating system and now create a directory that you will use to store the module.
Within my beaglebone board operating system, I created a directory named drivers.
This is shown below.
Now what we need to do is to take our main.ko file that we created and transfer it to this directory
we just created.
We can do this with the scp command in linux, as shown below.
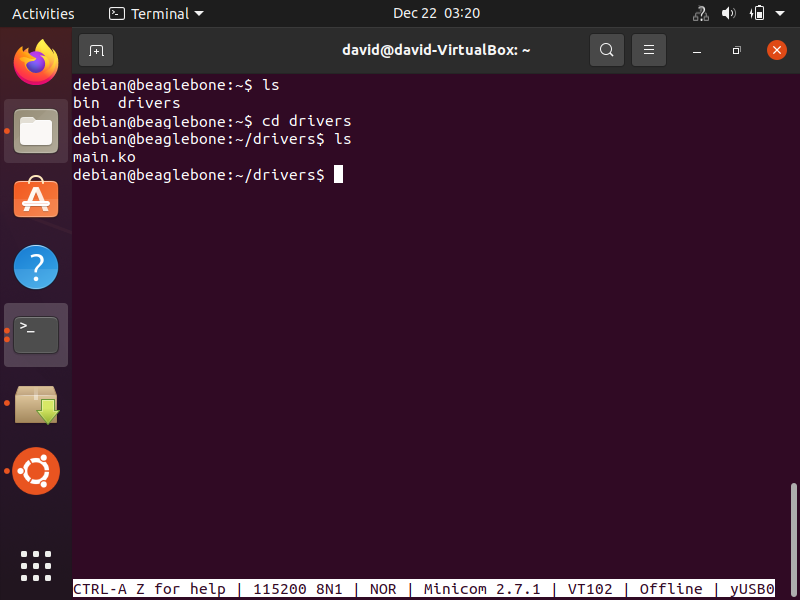
If this successfully goes through, you should be able to see the main.ko file now within the drivers
directory of the target host.
This is shown below.
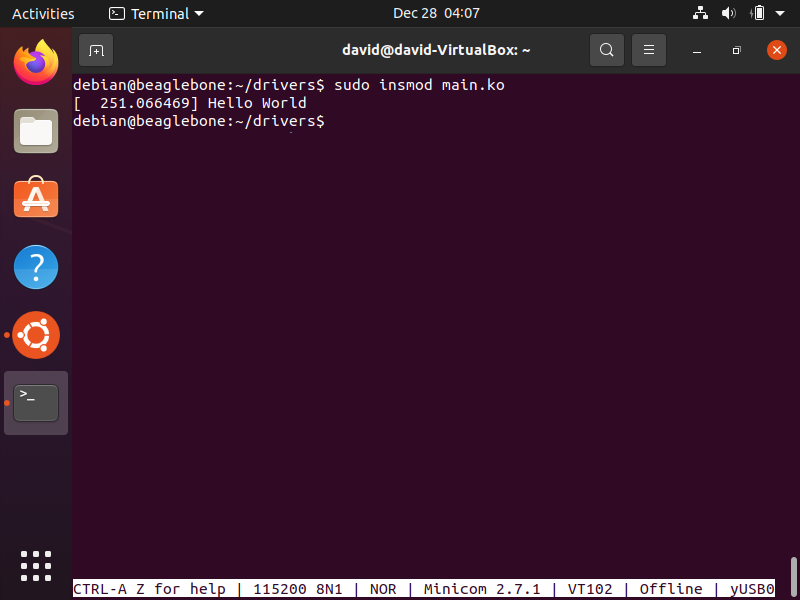
Now we will use the insmod command to run the hello world linux kernel module.
This is shown below.
There, you can see the "Hello World" output.
If we now use the rmmod command, we get the following output, shown below.
One very important thing to know is that when you are creating a module for a target board,
you should have that same linux kernel source code pre-built on your computer. This is because modules are specific to
linux kernel versions and won't run on any other
kernel version.
Therefore, the target device must have the same exact linux kernel version running on it, as that which you have
on your computer.
Otherwise, the insmod command will not work and you will receive an error message, Invalid module format. This
simply means the kernel version in which the module was built is not the same kernel version running on the target device.
To avoid this, it is always best practice to have the same
pre-built source linux kernel source code on your computer that is running on your target board. This will ensure there is
no incompatibility between the two.
So this is how to create a linux kernel module and run it on either the local host device
or a target host device.
Related Resources
/* Module initialization entry point */
static int __init helloworld_init(void)
{
/* kernel's printf function */
pr_info("Hello World!\n");
return 0;
}
/* Module's clean-up entry point */
static void __exit helloworld_cleanup(void)
{
pr_info("Good bye World\n");
}
/* This is the registration of the above entry points with kernel */
module_init(helloworld_init);
module_exit(helloworld_cleanup);
/* Descriptive information about the module */
MODULE_LICENSE("GPL");
MODULE_AUTHOR("David");
MODULE_DESCRIPTION("Hello World linux kernel module");
MODULE_INFO(board,"Beaglebone black");

Running a Linux Kernel Module on a Target Device