
How to Create a Probability Density Function Plot in Python with the Numpy, Scipy, and Matplotlib Modules

In this article, we show how to create a probability density function (pdf) in Python. To do this, we use the numpy, scipy, and matplotlib modules.
So let's first talk about a probability density function.
A probability density function (pdf) is a function that can predict or show the mathematical probability of a value occurring between a certain interval in the function.
It really is a calculus problem.
So we have a given probability density function. The total area underneath the curve is equal to 1 (or 100%). The area underneath the curve at a particular interval represents the probability of some interval occurring in the probability density function. This has to be a number between 0 and 1.
In calculus, definite integration solves the probability of an interval occuring in a probability density function for a certain interval.
For example, let's say that we have a graph of temperature during the month of August. Let's say that the average temperature is 80°F. And the x-axis ranges in temperature from 65°F at the lower end to 95°F at the upper end. Let's say that we want to find the probability of the temperature being from 65°F to 80°F. We would set up a definite integral so that the range goes from 65 to 80. You do the integration substituting these values in and you have then calculated the probability for a temperature occurring from 65°F to 80°F for a particular probability density function.
So a probability density function represents a function composed of continuous random data values that can predict with integration in calculus the probability of the occurrence of a certain interval in the function, which is represented by the area underneath the curve.
Below we create the code that creates a probability density function using numpy, scipy, and matplotlib.
So let's break down this code.
We first import norm from scipy.stats. This allows us to create a normalized probability density function.
We then import the numpy module as np. This means that we reference the numpy module with the keyword, np.
We then import the matplotlib module plotting function because we are going to plot the data.
So we use the numpy module to create the x-axis, we use sicpy to create a normalied probability density function, and then we use the matplotlib module to plot the data.
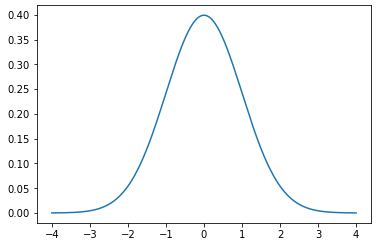
We create a variable, x, and assign it to, np.arange(-4,4,0.001)
What this line does is it creates an x-axis of values that range from -4 to 4 with an incremenet of 0.001.
We then plot a normalized probability density function with the line, plt.plot(x, norm.pdf(x))
We then show this graph plot with the line, plt.show()
After running this code, we get the following output shown below.
And this is how to create a probability density function plot in Python with the numpy, scipy, and matplotlib modules.
Related Resources
How to Randomly Select From or Shuffle a List in Python