
How to Build a Reed Switch Circuit

A reed switch is a very basic 2-lead switch that is switched on by a magnet being brought into the vicinity of the switch.
Simply put, it is a magnetic switch.
There are 2 basic types of reed switches. There are normally open reed switches and normally closed reed switches.
Normally open reed switches are those that are open circuit when placed into a circuit without a magnet in its vicinity. Without a magnet near the switch, the circuit will be open, so that no current flows through the circuit. Only when a magnetic is brought near the switch will it close, allowing current to flow through to power on a load, assuming the circuit has sufficient power.
A normally closed reed switch is the opposite. A normally closed reed switch will be closed without a magnet in its vicinity. This means that without a magnet near it, electricity can conduct across the switch and power on a load. When a magnet is brought near the switch, then it opens and the load will power off.
In this circuit, normally open reed switches will be used so that the load powers on only when a magnet is in its vicinity.
In this circuit, we will simply demonstrate the use of a reed switch by placing it in a very basic circuit. We will connect it to an LED, just to demonstrate how a reed switch works. After this, you can come up with ways to more creatively use reed switches and place it in more complex circuits.
This project forms the fundamentals of how reed switches operate.
Components Needed
- Reed Switch
- 470Ω resistor
- LED
- Magnet
If you only have a normally closed (NC) reed switch, this is no problem. It will just work in reverse.
Reed switches can be obtained cheaply from a number of online sellers, such as ebay or Tayda electronics ( Tayda Electronics- Reed Switches).
Reed switches are normally rated to handle a maximum amount of current and voltage. But for electronic purposes, these most likely will never be exceeded, since reed switches normally can handle over 1 ampere of current and hundreds of volts, so this, again, is really no concern for electronics.
The only other components we need are an LED and a current-limiting 470Ω resistor to limit current to the LED, so it doesn't burn out.
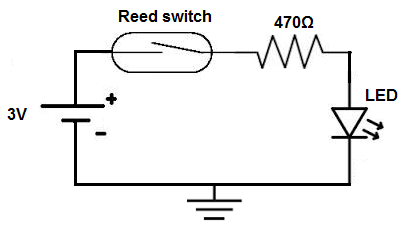
Reed Switch Circuit
The reed switch circuit we will build is shown below.
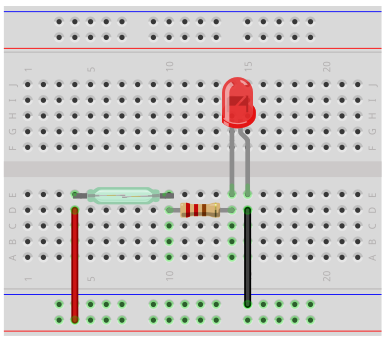
This above circuit built on a breadboard is shown below.
How this circuit works, for a normally open reed switch, the circuit will be off without a magnet. Once the magnet is brought near the vicinity of the circuit, it will turn on and the LED will be powered on. This demonstrates that a reed switch is a magnetically-driven device.
With a normally closed reed switch, the circuit will be on without a magnet, so the LED will be lit. Once the magnet is brought near the vicinity of the circuit, it will turn off and the LED will be turned off.
And this demonstrates the operation of a reed switch.
Below is the real-life circuit of this project built so that you can see for yourself how it operates.
Related Resources
How to Build a Dark-activated Switch