
How to Build an Infrared Distance Sensor Circuit
An infrared (IR) distance sensor is a sensor that can measure distance from a solid or physical object.
An infrared distance sensor does this through light waves.
It sends out infrared light and waits to receive it back at the receiver end. If it receives back the infrared light, this means that the light waves have bounced off of a physical object and has returned back to the sensor. If it does not receive the light waves back, then this means there is no physical object in front of it within viewing angle.
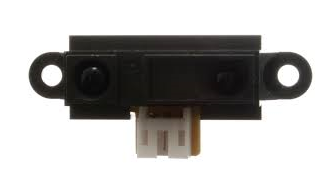
The infrared sensor we will use is the Sharp GP2Y0A21 Infrared Distance Sensor.
We will write code so that if the sensor detects an object that is within a few inches of it, it will turn on and light up an LED.
This is an analog output LED, so we will connect this sensor to an arduino microcontroller in order to
read the analog output. Therefore, we will connect the sensor to an Arduino microcontroller to build this infrared distance sensor circuit.
Components Needed
- GP2Y0A21 Infrared Distance Sensor
- LED
- Arduino
The Sharp GP2Y0A21 Ultrasonic Distance Sensor is relatively cheap. It can be gotten for a little over $6 on ebay.
It runs on anywhere from 4.5V- 5.5V of DC power, so the 5V terminal that the arduino has is perfect for powering this infrared sensor.
The sensor typically runs on 30mA of current. So it uses about 150mW (30mA x 5V= 150mW).
It has a pretty quick response time of 30ms (±10).
The datasheet of the sensor can be found at the following link: GP2Y0A21 Infrared Distance Sensor Datasheet.
The sensor has 3 pins in total. 2 are power pins and 1 is the analog signal output.
The pinout for the HC-SR04 is shown below.
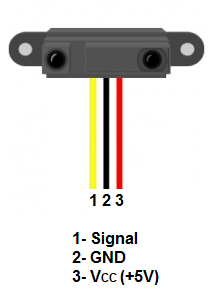
The power pins are the red wire, which is +5V, and the black wire, which is ground. VCC and GND. So the red wire is connected to VCC. GND is connected to ground.
The yellow wire (signal) is the wire that contains the analog output signal. This is a voltage on the signal wire that the arduino reads and converts to an analog value ranging from 0 to 1023. When the sensor detects an object 80cm away (farthest it can detect), the output voltage signal is about 0.4V. When the sensor detects an object 10cm away (the closest it can detect), the output voltage is typically 2.3V. So there is a difference of 1.9V between the closest and farthest the infrared sensor can detect. This voltage, again, is directly proportional to the analog value that the arduino will produce.
So if the sensor detects no object, the output voltage and analog reading will be pretty much 0 (no object detected). However, if an object is detected, the voltage and analog
reading will be above 0. The output voltage will be be anywhere from 0.4V to 2.3V. And the analog reading will be anywhere from 1 to 1023.
Infrared (IR) Distance Sensor Circuit
The Ultrasonic Distance Sensor Circuit we will use to measure distance from
the object detected is shown below.
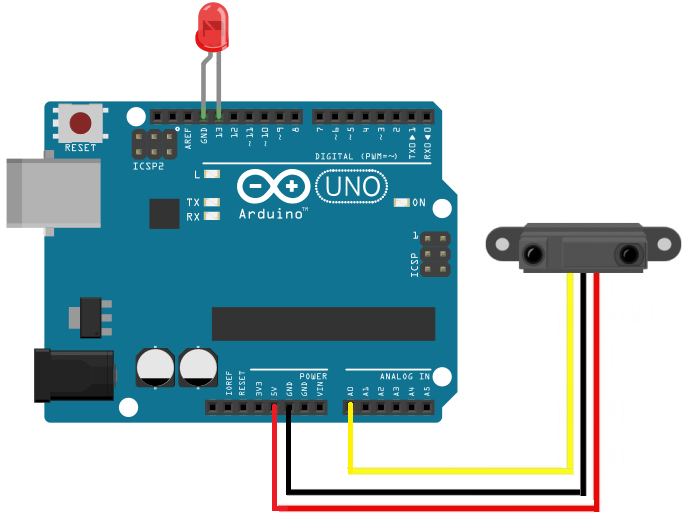
The circuit is very basic in connections.
The power pins are connected to the +5V and ground terminals of the arduino so that it can have sufficient power to operate.
The signal pin (yellow wire) is connected to analog pin 0 (A0) on the arduino board.
With this physical setup, all we need now is the code below.
Code
The code in order to detect objects a certain distance away is shown below.
const int signalPin= 0;
const int LEDPin= 13;
int signal;
void setup() {
Serial.begin(9600);
pinMode(signalPin, INPUT);
pinMode(LEDPin, OUTPUT);
}
void loop() {
signal= analogRead(signalPin);
Serial.println(signal);
delay(500);
if(signal < 200){
digitalWrite(LEDPin, HIGH);
}
else{
digitalWrite(LEDPin, LOW);
}
}
The first block of code declares all of the variables that the code uses. The first 2 variables, on the first 2 lines, declare the pin connections to the arduino board. The signal pin, which is the pin that the infrared sensor sends out to the arduino board connects to analog pin A0 of the arduino. The LED connects to digital pin 13 on the arduino. The next variable, signal, is the signal will give us the analog reading from the infrared sensor.
The next block of code, the setup() function, creates a Serial connection so that you can view the Serial monitor, which displays the analog output. Without this code, you wouldn't be able to see any print results.
The next block of code, the loop() function, is the code that is executed over and over again. Here we read the value from the analog pin A0, the signal, and we store it in the variable signal that we created. Then we print out the results. We delay the next signal 500 milliseconds or a half a second. If the signal is below 200, then this means that the sensor has detected an object that is within a few inches of it. In this case, the LED will turn on, alerting us to the close proximity of this object.
Readings are taken every half a second. You could adjust this to take readings how many times you prefer. If you want readings to be taken after second, the delay would be 1000 (1000 ms= 1 second). If you want readings taken every 5 second,s the delay would be 5000.
This circuit can be adjusted in many ways. First of all, multiple sensors can be used. So if you need to detect objects from multiple directions, as many directions as you need
sensed, you need an additional infrared sensor. If you want to detect objects from the front and the back, you would need 2 sensors. If you want to detect objects from the front, back, left
and right, you would need 4 infrared sensors. You would just have to create a common +5V and ground line for power. And the signal lines for each of the sensors would go into one of the analog
terminals. Being that there are 6 sensors (on the arduino duemilanove and arduino uno), you could connect up to 6 of these sensors(but you probably wouldn't want to because who wants to spend money
buying 6 sensors, but this is the theory.) You could also change the LED to any other output device such as a buzzer or anything, but you may have to adjust power depending on the power
requirements of that device.
Related Resources
How to Build an Ultrasonic Distance Sensor Circuit