
How to Boot a Linux Operating System from an SD Card in a Beaglebone Black Board
So a beaglebone board is an embedded microcontroller which can run the Linux operating system.
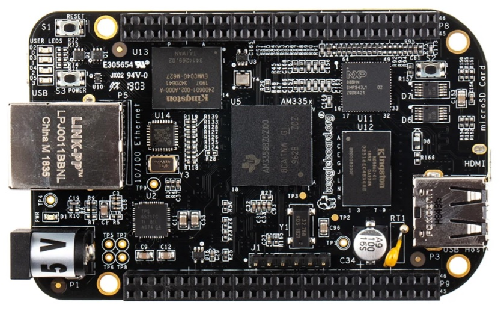
The BeagleBone board has an SD card slot at the bottom of the board, which can hold a microSD card. Be aware that the card must be a microSD card, as the full size SD card cannot be directly used with the adapter that the board has.
So with using the microSD card, we can download the latest debian operating system onto the SD card.
We can then place the SD card into the slot on the board and boot the operating system from the SD card.
If you are not sure how to write to an SD card, you can view the article, How to Download a New Boot Image to an SD card in Windows.
The article above shows how to download a boot image in windows, but the concept is the same with another operating system. But you will have to find another software specific to that operating system that can write to an SD card.
So once you have written the boot image to the SD card, then the next step is to place the SD card into the SD card adapter on the beaglebone board.
Next, you need to supply power to the beaglebone board by connecting it to the USB.
You also want to connect a USB to TTL serial adapter cable from the board to a computer, so that you will be able to run some tests through the serial port to make sure the booting from the SD card was a success.
After you have all the hardware connections set up, then you need to open the software which monitors the serial port, such as tera term or putty.
Once you have done the necessary software configurations such as making sure the Serial Port setup is set to a speed of 115200, then we can then go to the booting process.
So in order to boot from the SD card, instead of the linux operating system that is flashed onto the board's eMMC, you have to do the following steps. There are several buttons on the beaglebone black board. The ones of concern for us now are the S2 and S1 buttons. The S2 button is the boot button. The S1 button is the reset button. Press and hold the S2 button on the beaglebone board, which is boot button. While you have this button pressed down, then press the S1 (Reset) button. If you have the S2 button held down while the board is resetting, then the beaglebone board will boot from the boot image on the SD card.
Some guides will tell you that you should hold down S2 while pressing the S3 (Power) button, but this is not good practice, as resetting the board is really want you want. And I find that pressing the reset button has a much higher success rate. Because your goal is simply to reboot the board, not to shut it off.
I downloaded the boot image for debian distribution 8.6 onto my SD card.
After booting from the SD card, I received the following setup shown below.
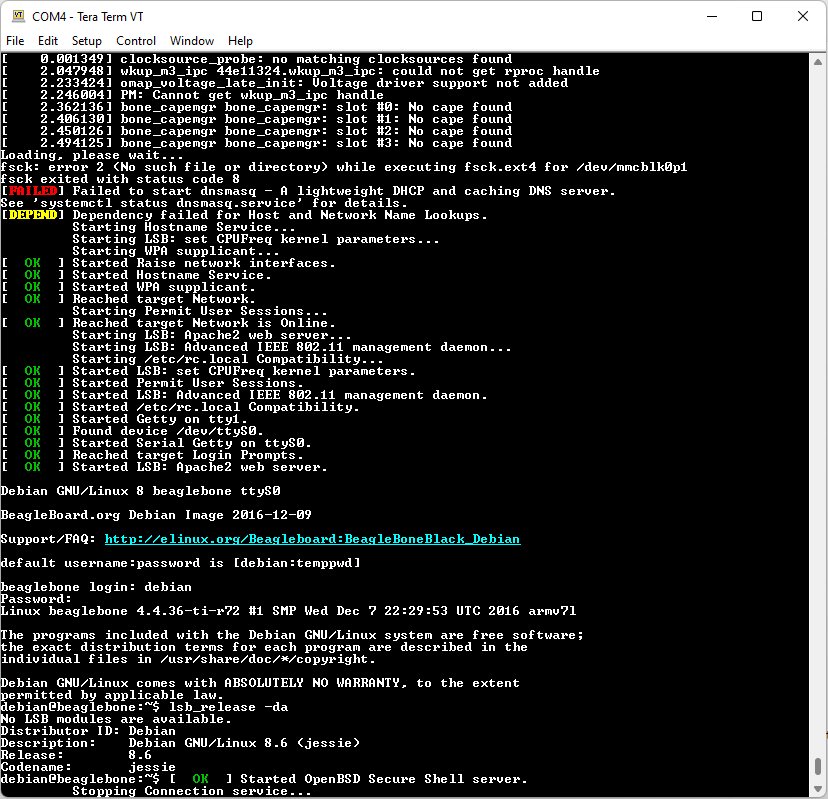
Note that beaglebone black boards Rev C come with debian distribution 10 flashed onto the eMMC from the manufacturer.
If you download a debian distribution 10 onto the SD card, it may not show a difference even if it is a difference version such as 10.3 or something else. This is because it may just show us 10 when you are typing in the command, lsb_release -da. For this reason, it is recommended for this program that you download a completely different distribution such as distribution 8 or distribution 9. This way, you can easily see the difference.
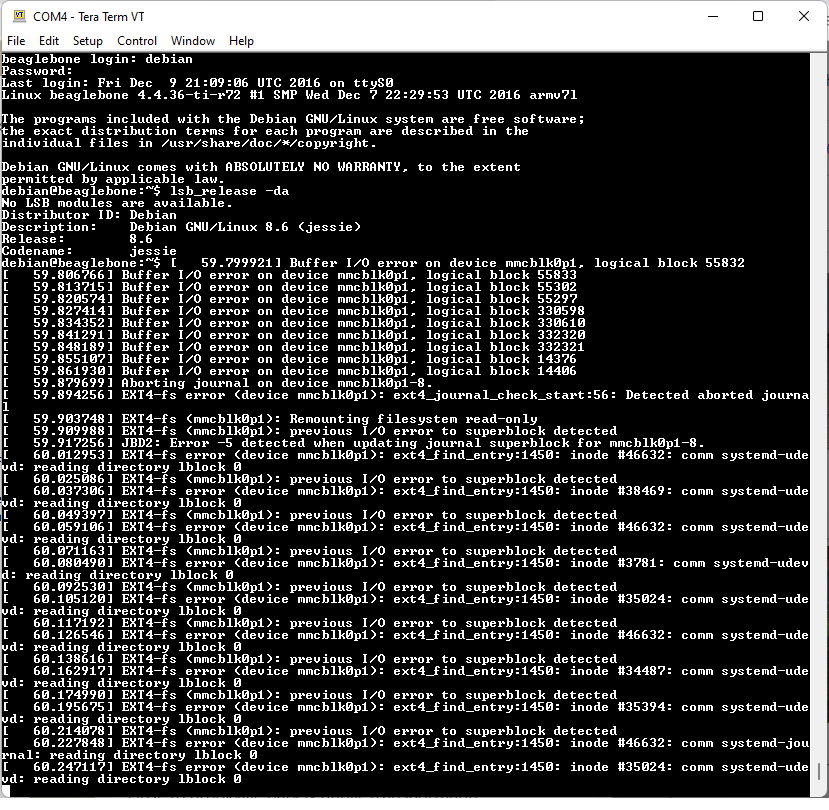
Note that if you now were to remove the SD card from the board, then you would get a series of error messages
in the log output, indicating that the SD card is no longer mounted.
With the SD card now removed, if you press down on the S1 (Reset) button, then the board will once again boot from the boot image flashed onto the eMMC on the board rather than from the SD card.
So this is how to boot a linux operating system from an SD card in a beaglebone black board.
Related Resources