
How to Insert Data Asynchronously Into a MySQL Database Using AJAX and PHP

| Enter Your Name | |
| Enter Your City | |
| Enter Your Country |
In this article, we show how to insert data into a MySQL database using AJAX and PHP.
Through AJAX, we can make asynchronous requests to the server to insert information to the server such as into a database like a MYSQL database.
This way, a user can keep on working and viewing a web page while information is being transferrred to the server without the page having to be refreshed.
So AJAX is a powerful language that allows us to send asynchronous requests to a server so that a web page can send information to the server without the page having to be refreshed.
In order for AJAX to work, 2 languages must be used, a client-side language (this is Javascript) and a server-side language such as PHP or ASP.net. The thing about AJAX is it allows a programmer to combine a client-side language with a server-side language to get the benefits of both and combine in them.
With AJAX, client side triggers can send server-side information.
So AJAX allows like the best of both worlds.
It's like Javascript being a client and server side language at the same time. But it's not Javascript working alone. It's javascript doing the client side work while making a request to the server (through the browser) to send information to the server (such as a database like a MySQL database). We then let a server-side language take over to send the server data.
So this is the benefits of AJAX.
It allows us to do server side work without having to refresh a page because we communicate asynchronously with the server while a user continues to work.
So looking at the form above, you see a standard user information page, where a person fills in information. This form asks for a person's name, city, and country.
With AJAX, we can send the data from this form and insert it into a MySQL database. We then use the PHP script to output the table so it can be shown below.
This form uses the javascript onblur() function for the country text box, which means that the ajax function is called when the user clicks on the country text box, writes something, and then clicks off the box. When the user does this, AJAX takes this data from the form and inserts it into a MySQL table. Again, this is all done without the page having to be refreshed.
Try entering your name, city, and country into this form. All fields of this form must have data entered into it, or else the AJAX script won't insert the data into the MySQL table.
Once you have entered into all form fields and clicked away from the country text box, you should see the data you entered appear on the table below the form. This table echos out the MySQL table we created.
So AJAX is very useful in that it can do any server side work with client side actions.
So now we will show how to go about inserting information into a MySQL database using AJAX and PHP.
So how do we do this?
MySQL
So first let's go over what I did in my MySQL and it's very simple.
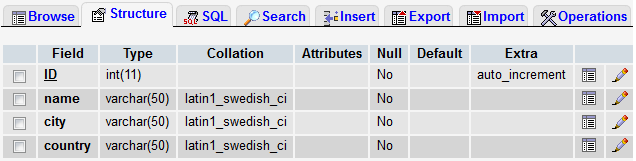
So in MySQL, I created (actually used an existing) database and created a table called Userdata.
This table is composed of 4 columns, ID, name, city, and country.
The ID column is of type INT(11), name VARCHAR(50), city VARCHAR(50), and country VARCHAR(50).
The structure of the table can be seen below.
So this is all that has to be done in the MySQL side of the code. I did this using phpMyAdmin.
You can do the same or something similar.
HTML and Javascript Code
The HTML and Javascript code to create the name, city, and country text boxes
as well as to call an asynchronous request when the user clicks away from the country text box is shown below.
So this is all the Javascript and HTML code needed to create asynchronous requests for our user data from.
We'll now go through each line of code so that you understand what each does.
So we add <script> tag to our code to indicate that we're going to add Javascript to the page. Any type of Javascript entry requires an opening and closing script tag.
We then create a function called insertUserData(). This function, as it's named, is designed to insert the data that the user enters into a table of a MySQL database.
The first thing we do in this function is create a variable called request. This variable will represent a request object, which is absolutely imperative in order for the browser to request communication with the server. Otherwise, AJAX is impossible. The request object is pretty much the heart of AJAX.
The most common way to create a request object is through the line, request= new XMLHttpRequest(); Through this line, most browsers can create a request object, which then can be called so that a browser can communicate with the server. However, this line may not work for all browsers. Therefore, we use try catch statements to create a request object by other means in the event that the browser cannot do so through the first way. So we try also the tryMicrosoft function and the otherMicrosoft function. These are more specific to Microsoft browsers such as Internet Explorer for creating a request object. If all the methods fail, the last method failed is run, which makes the request object equal to null; if this happens, asynchronous communication cannot occur because the browser has no way of contacting the server. However, if you are using any type of major browser, this shouldn't happen. You should be able to create a request object.
You'll see how this request object is used later in the code. But if you want a full in-depth article on request objects, see How to Create a Request Object in AJAX.
So after we've created a request object, we then create a variable called url, which contains the name of the PHP file that processes our data. I named my file, process.php.
Next, a variable named person_name has been created which stores the value that the person enters into the name text box.
We then create a variable called person_city, which stores the value of the city that the user enters into the city text box.
We then create a variable called person_country, which stores the value of the country that the user enters into the country text box.
We then create a variable called vars. This variable will stores the values of the user's name, city, and country. This variable is written as a name=value pair. The name=value pair is the username. Since the name equals the variable person_name, the total statement "name="+person_name. In between each name=value pair has to be an ampersand (&). This separates the different name=value pairs. The second name=value pair that we send is "city="+person_city. The third name=value pair that we send is "country="+person_country. Again, an ampersand must separate this from the previous pair.
This variable vars is very important and in fact can be seen as the heart of the PHP file, insert.php, that processes our request. Using this vars variable, we can have PHP parse this variable and extract the data from it. Thus, from this vars variable, we can know what a user enters into these name, city, and country text boxes. We'll show how to do this in PHP when we get to the PHP code.
Next we take the request object and use the open method on it. This open method decides whether we use the POST or GET method. It takes the URL that we want parsing the data that we submit to. And it determines whether the request should be asynchronous or not. By making the third parameter true, the request becomes an asynchronous request which is what we desire.
The line, request.setRequestHeader("Content-type", "application/x-www-form-urlencoded");, is just for character encoding of the variable vars we are sending. For the vars variable, it is organized in name1=value1&name2=value2&name3=value3 order. Now say for instance, that the value had the ampersand symbol (&), this could throw off the vars variable and cause an error. To protect against this, we put this line in the code.
Next, we take the request object and find its onreadystatechange property and set it equal to function(). The onreadystatechange property is a property that changes as the server processes a request by a browser. It has 4 states, 1 is the first inital state and 4 means it's absolutely ready. If request.readyState is equal to 4, this means that the server has obtained the request object from the browser and is ready to process the data sent. There is also another property named status that we can check to determine if everything is in place. If ready.status is equal to 200, this means that all is OK. Once these 2 parameters are in place, we create a variable called return_data and set it equal to request.responseText. The responseText variable is the data which the PHP file returns. Let's say you have a PHP file processing this request and in turn you set so that the PHP file echos a certain statement such as, "Everything has been processed well." This statement then goes into the responseText, which receive back after everything has been processed on the server side. So the return_data is very important. It's the output of the PHP file that processes the request on the server side.
We then take the Javascript document.getElementById() function to get the element on our HTML page that has the Id of status. We place this right next to the username text box that has the HTML label tag. This label tag has the Id of status. We access the contents of this label tag through .innerHTML. This property lets us write data to the HTML label tag that has the Id of status. We then set it equal to return_data, which is the data that the PHP file echoes out.
The last statement, request.send(vars);, is the statement that actually executes the sending of the vars variable, so that the PHP file can process it. So it isn't actually sent until this statement.
So this is all that is required on the HTML and Javascript.
The last thing we have is the PHP code.
PHP Code
So the last thing we have is the PHP code, which is the server side language that can actually speak to the server.
Javascript cannot manipulate server information. A server side language is needed, and that's PHP.
So we need a server side language to send the data to the server, so that we can process this data and output a result based on this data.
The PHP code that we use is shown below.
So this is our PHP code above.
The first line uses a PHP variable called $name_entered. It gets the value of the name that the person has entered in the name text box. Remember that the vars variable contained, var vars= "name="+person_name+"&city="+person_city+"&country="+person_country; PHP is able to extract the data that the person has entered into the name text box through the name=value pair. So all we have to do is create a PHP variable and set it equal to the value of the name of the pair. So we set the $name_entered variable to $_POST['name']; PHP will then get the value that the person has entered into the name text box. The same is true for city. We create a variable named $city_entered and set it equal to $_POST['city']. City is the name attribute of the value entered into the city text box. Lastly, we do the same for country. We create a variable named $country_entered and set it equal to $_POST['country']. Country is the name attribute of the value entered into the country text box.
Since we are sending data using PHP to a MySQL database, we have to set up connection to the database. This requires a username, password, hosting name, database, and table name (of the table we want to send data to).
We then connect to this database via the mysql_connect() function and @mysql_select_db() function.
If the name, city and country variables aren't empty, then we use the PHP mysql_query to insert data into the table that I called Userdata.
We then create a variable $result which is a query to the table we selected. We use the mysql_query() function to query this table. We select the columns name, city, country on our table. So this is the query.
We then display out the table. You may or may not be interested in displaying the table.
But if you are, we fetch all the rows in the table using the line, while ($row = mysql_fetch_array($result))
We then can access each value in the rows using the lines, $name_field= $row['name'];, $city_field= $row['city'];, $country_field= $row['country'];
After we get the data, it's just standard HTML to output the table.
So this is all that is required to send data asychronously to a MySQL database using PHP and AJAX.
This code shows the huge power of AJAX in applications for the web to send data asynchronously.
Related Resources
How to Retrieve Data From a MySQL Database Using AJAX and PHP