
How to Create a Register and Login Page Using PHP

In this article, we show how to build a register and login page using PHP.
A register page or form can be used for your website to register users in the event that your website takes in users. Maybe your website uses members and you want to sign up members. Or maybe your site doesn't have members. You want to just take down information from users, for maybe like an email list so that you can send them email. However, most of the time, it's probably for members. It may not be for any type of social platform. Maybe you just want people on your site to have accounts, so that maybe they could upload documents or projects they've done.
For, example, this site doesn't have members (forum doesn't count). It doesn't sign up members so that a member has his/her own account. But if it did, it could be used for something like a member trying to share his/her own electronic product or possibly code.
So a register and login system can be used for something like that.
Register Page
So before we have a login page, we need to first register users. We need to first get users in the database so that they are officially registered.
How we do this is we create a database through MySQL.
And then once we have this database, we use a register form where a user can type in information, such as his/her first name, last name, username and password.
Once the user clicks the form submit button, this information is then sent and stored in the MySQL database.
So what's the code to go about the create a register form?
Code for Register Page
We will show and explain the code needed to create the register page below.
You can also see it in the following text file at the following link: Code for Register Page.
PHP Code
The first block of code needed to make this form work is the PHP code.
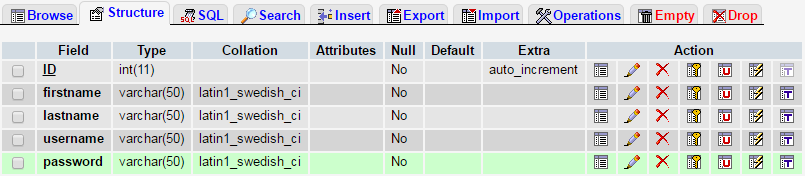
So with this PHP code shown above, we create a connection to the MySQL database that will hold the user data from the register form. This MySQL table has 5 fields: ID, first name, last name, username, and password.
To connect to the database, we need a host name, user name, password, database name, and the name of the table which will hold the user data.
I created this table using phpMyAdmin.
The ID column is of type "int" and is set to auto-increment.
The first name column is of type "varchar" and is given a value of 50.
The last name column is of type "varchar" and is given a value of 50.
The username column is of type "varchar" and is given a value of 50.
The password column is of type "varchar" and is given a value of 50.
An image of the structure of this table can be seen at the following link: Table for User Registration and Login.
Once we have all of this set up, we retrieve data from the HTML form whose code is shown below.
This is done through the superglobal $_POST array. From the HTML form, we obtain the first name, last name, username, and password entered in by the user. We also obtain data from the submit button see whether it has been clicked or not.
We then connect to the database using the mysql_select_db function.
We then query the database to find out whether the username that the user has entered. We store this in the variable $username_table.
We then create a variable named $count and count how many rows exist based on this query. The reason we do this is if the $count variable is equal to 0, this means that the username has not been taken, so this user can use that user. If the $count variable is not equal to 0, this means that it is taken and this user cannot take it (since it's already been taken).
The next block of code has an if statement. If any of the variables, $firstname, $lastname, $username, and $password1 are empty, then nothing that the user entered into the register form will be transferred to the MySQL table.
If the fields are not empty (the user has entered into all of them), then there is one more if statement. If the $count is equal to 0, then we insert the data that the user has entered into the form into the MySQL database table. Remember the $count variable holds whether the username is taken or not. If it is 0, this means the username that the user has entered is not taken and thus can be used. If it is not 0, the username is taken; thus we cannot add it to the table (this would create duplicate usernames which of course is forbidden).
The last line simply closes the database connection. Since we've already inserted the data from the HTML form into the MySQL table (if the username wasn't taken and the form fields were all entered), we can close the connection to the database and its table.
This is all the PHP code needed to create the register form.
HTML Code
The HTML code for the register form is shown below.
So the above code creates the form needed in which the user will input data.
In this form, we create 4 text boxes. The text boxes asks for the user's first name, last name, username, and password.
All the text boxes are of type "text" except the password textbox. The password text box takes on the type "password", so that the characters entered into it are encrypted. Otherwise, it is just like the other text boxes.
For each of the text boxes, the text box cannot be left blank; else, the form will output, "This field cannot be left empty". How we do this is through 2 if statements for each text box. The first if statement checks the variable $submitbutton. This variable holds whether the submit button of the form has been clicked. If the submit button has been clicked, it will be true. If the submit button has not been clicked, it's false. If the submit button has been clicked and the field is empty, then the statement, "This field cannot be left empty" will be output.
For the username text box, there is an additional if statement. If the submit button has been clicked and the $count variable is not equal to 0, this means this username has already been taken (since it's already present in the database.
Lastly, we have the submit button. We name this button "submit".
This completes the form.
This completes all of the code needed to create the register page.
Login Page
Next we need the login page.
Code for Login Page
So now we go over the code for the login page.
This code is shown below.
We also show this code in the following text file at the following link:
Code for Login Page.
The code for the login page is very simple. It is simply an HTML form.
The form contains the fields, Username and Passworld.
These are the only fields required for a user to log in.
The form, as only forms require, needs a submit button.
Once clicked, the form redirects the user to the PHP page, login-confirmation-page.php using the POST method.
Again, this is all that is required for the login page.
Login Confirmation Page
The last page is the login confirmation page. This is the page the user gets brought to after s/he has logged in.
Once you use the login page, you'll be brought to the confirmation page.
Code for the Login Confirmation Page
The code needed for the login confirmation page, which is entirely PHP code, is shown below.
We also show it here in the following text file at the following link:
Code for Login Confirmation
Page.
So, again, we create our connection to the MySQL database table.
We then take the login information from the login form that the user entered in through the superglobal $_POST array. These are the $username, $password1, and $submitbutton variables.
We make the connection to the database.
We then query the table of the database to see whether the username that the user has entered exists or not.
We also store the values of the first name, last name, and password of that username (assuming it exists).
We then use an if statement. If the $count variable is 0, this means that the username that the user entered does not exist. So we echo the statement, "Sorry, login was not successful. The username entered does not exist" We then redirect the user back to the login page to retry.
If the $count variable is equal to 1 and the password entered doesn't match the password in the database, we echo the statement, "Sorry, login was not successful. The password entered was incorrect." We, again, redirect the user back to the login page to retry.
If the $count variable is equal to 1 and the password entered matches the password in the database, we echo "Hi" and the user's name. The ucwords() function capitalizes the user's name
in the event that the user entered his/her name in lowercase. We also echo to the user, "you have been successfully logged into your account".
And this is all that is required to make a simple register and login page using PHP.
Of course, there are many variations that can be done to this register and login page.
For example, in the register form, we can new form fields such as get the user's gender, date of birth, any other information, etc. However, the more simple and invasive a form field, the more a user will trust it. However, you can add how many information fields you want. It's also based on what type of site you're running. Depending on what site you run determines what information you may need a user to reveal.
Besides the form fields, we can make it so that the user can have a password reset option in the login form. We will reveal the modifications needed to create a password reset option, so that if the user forgets his password, he can reset it. This isn't hard. We simply have to create another page where the user types in his username. We then create a connection to the table of the MySQL database and rewrite the current password in the password field.
There are many variations. However, this form can be used as a fundamental root of what is necessary to create a register and login page using PHP.
Using only PHP, we can create a pretty decent register and login form using PHP.
It's decent but it isn't as good as if you had jquery code involved. This is because we must submit the form in order to find out whether a username is taken. Modern up-to-date companies allow you to tell whether a username is taken without a user having to click the submit button of a form. This is more efficient.
However, again, for a basic register and login page for your site, the code above runs very well.
Also, this page shows just how to create a register and login page. One more element that needs to be added and considered is the session_start() function in PHP. For example, once a
user logs on into his account, once he will switches to another page on the site, you still want him to be logged on. Therefore, once a user logs on, we have to start a session, so that he
remains logged on while maneuvering through the site. To see a full tutorial on session, see
How to Use Sessions to Track User Data Using PHP. This will show you how once a user
has registered in, how we can keep the user logged in even while the user visits different pages on the site. You don't want the user's session to end after the register page. You want to user
to remain logged in until the user logs off. To do this, you need to start a session once the user has logged in. This keeps the user's log in session lasting even while the user visits other
pages on the site.
Related Resources
How to Upload Images to a Website Using PHP
How to Upload Files to a Website Using PHP
How to Create a Search Engine Using PHP
How to Create Your Own File Transfer Protocol (FTP) For Your Website Using PHP
How to Create a Confirmation Page for an HTML Web Form Using PHP
How to Insert Images into a MySQL Database Using PHP
How to Create a Searchable Database Using MySQL and PHP
How to Search a MySQL Table For Any Word or Phrase Using PHP
How to Create a Send Email Form Using PHP and MySQL
How to Create a Newsletter from Scratch using PHP and MySQL