
How to Build a Simple Photoresistor Circuit

Now we will build a very simple photoresistor circuit to make a photoresistor do what it does: make the circuit work when there is light and stop working when there is darkness. For this circuit, we connect a photoresistor to an LED. When the photoresistor is exposed to light, the LED is on and stays lit. When the photoresistor is exposed to darkness, the LED turns off and does not light. This project demonstrates the function of a photoresistor.
Parts
9-Volt Battery
Photoresistor
A LED
Different photoresistors have different threshold values of light and dark
resistance. But regardless of which photoresistor you use, the result will be the same for
any that you choose.
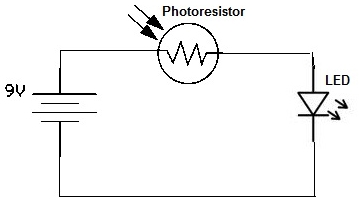
This is the schematic of the circuit to be built:
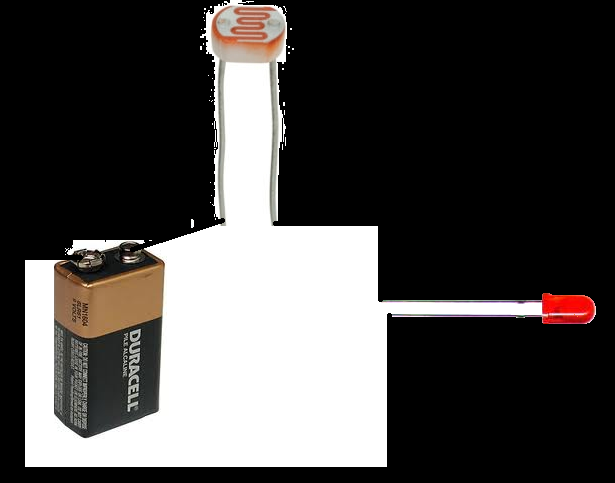
This is a more real life like representation of the circuit.
Photoresistor with Light

This is the photoresistor circuit when the photoresistor is exposed to light. When exposed to light, the photoresistor has very little resistance, so current can flow through the circuit. The LED receives current and lights up; it stays lit as long as the photoresistor is exposed to light.
Photoresistor in Darkness
Now put a thick cloth or pen lid or any object that doesn't absorb light over the photoresistor.
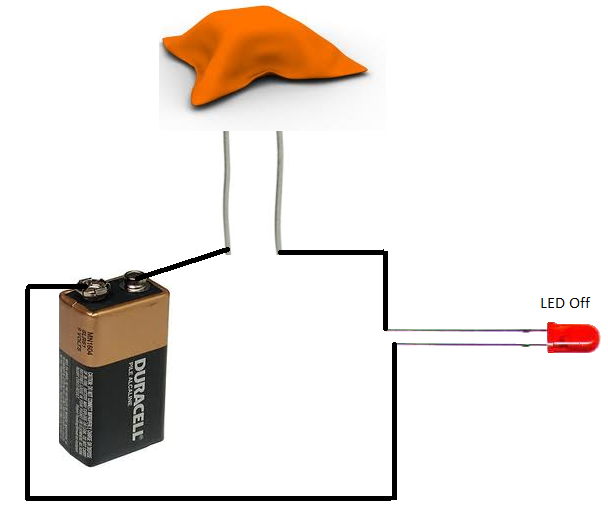
Or, if you can, just turn off the room lights if it can lead to total darkness:
This is the photoresistor circuit when the photoresistor is exposed to darkness. When exposed to darkness, the photoresistor has very high resistance, so current cannot flow through the circuit. The LED receives no current and, thus, does not light up. The LED stays off as long as the photoresistor is exposed to darkness.
In this circuit, the LED turns on when the photoresistor is exposed to light and turns off when the photoresistor is exposed to darkness. To learn how to
build the circuit so that it's the other way around- so that the LED turns on when the photoresistor is exposed to darkness and turns off when exposed to light, see
How to Build a Dark-activated Light Circuit. This is a more practical
and useful circuit, because we need light more when it's dark rather than when it's bright. This basic circuit was illustrative in that it showed the basic principles
of how a photoresistor worked. However, to use it for more advanced and useful circuits, using a photoresistor to turn on a light when it's dark is more useful.
Related Resources
How to Build a Dark-activated Switch
How to Build a Light Alarm Circuit
How to Build a Simple Force sensing resistor (FSR) Circuit