
How to Insert Videos into a MySQL Database Using PHP

In this tutorial, we will show how to insert videos into a MySQL database using PHP.
In fact, we really are not inserting videos into the database.
Doing that would be the harder way of doing it.
Instead the easier way of going about it is to upload the video to a directory on your website and simply insert the filename of the video into the MySQL database.
Then all you need to do after that is specify the full path to that filename, so that the video can be displayed and played.
This is a much, much easier, and simple way of going about it then to actually upload videos into the database, which is complex and really unnecessary.
Below we used to have a form for users to upload videos but have taken it out due to malware concerns.
In order to insert videos into a MySQL database, as explained before, we don't actually put the videos in the database. We put the videos in a regular folder on our website. I created a videos folder (or directory) on my website which the video files will upload to. In the MySQL database, all you do is place the video name along with the file extension of the video. We also place a description of the video in the database. However, to display the video, all we need is the file name of the video and the file extension. Once we have these, all we have to do in the PHP code is specify the full path to this video, so that it can be displayed and played.
So, again, we upload the video to a directory on our website. We don't put the video directly in the MySQL database. We upload it to a directory on our site. We simply get the video file name and file extension of the video and place it in the MySQL database. We then have the complete pathway to the video in our code so that we can show and play it.
So if we're saving a video named, amazon.mp4, we save the full file name, amazon.mp4 and we also save the file extension of the video, which is mp4.
We will go through this below.
In this demonstration, I'm going to use phpMyAdmin. When creating a table in MySQL, we create 4 columns.
One column is the ID column, which should be present in really any MySQL table. This column is unique and should be set to autoincrement. It counts sequentially 1 up from any new row of data inserted. So it starts at 1. If you insert 5 rows of data, the fifth row will have an ID of 5. The purpose of it is that it's unique and it gives you a way to order the new uploads in order of when they were uploaded. You could also do this in other ways. But this is probably the easiest way of showing the videos in order from when they were uploaded.
The second column that I created was a description column. This holds a description of the video being entered. Once the user puts a description of the video in the text box and uploads the video along with the description, the description of the video entered will be inserted into the descripton column of the table.
The third column that I created is the filename column. This holds the full file name of the video. So if you're uploading a video named basketballgame.mp4, the full file name entered into the filename column is basketballgame.mp4
The fourth and last column that I created is the fileextension column. I created a dedicated column for the file extension because we play the videos using the HTML video tag (<video>). With this tag, you must specify the file extension of the video. Therefore, it's best to create a column that holds the file extension for each video. There are other ways you could get the file extension, but this is the best and surest way to do so.
Below you can see the structure of the table created that serves as the video uploads table.
Since it holds video information, I named the table, 'Videos'. You can see the image of the
structure of the table below.
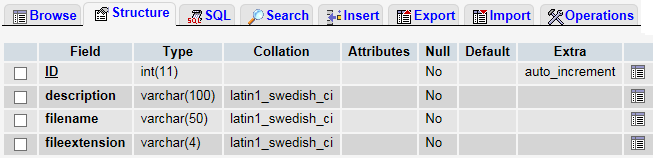
So you can see the structure of the table above.
The ID column is of type int (11).
The description column is set to VARCHAR(100) to allow it to hold a good deal of characters. Sometimes the user may want to put in a somewhat good description of the video, so we allow up to 100 characters.
The filename column is set to VARCHAR(50) to allow for a somewhat long filename.
The file extension is set to VARCHAR(4), since file extensions can be up to 4 characters long.
The reason we use VARCHAR for all these fields is because it allows a variable amount of characters. CHAR is a fixed amount. You would use CHAR when every upload is the same amount of characters. This would be the case for a few things such as state abbreviations, since they are all 2 characters. In this case, CHAR wouldn't work for any of the fields. Even the file extension can vary between 3 characters (mp4) and 4 characters (webm).
Of course, if you need to, modify the amount parameters to satisfy your needs.
HTML Code
So now let's go over the HTML code needed to create the uploader seen above, which allows for videos to be uploaded.
The HTML code is shown below.
The HTML code above creates an upload form. Since we want this page to keep all information obtained from the form, we set action equal to "". If we wanted to send the information entered into this uploader to another page, we would specify that PHP page. But since we want the information for later PHP code on this page, we set action equal to nothing. The method is POST. And for file uploading, the statement, enctype="multipart/form-data" must be input. If not, file uploading will not work.
The line underneath is a line that creates a text box, which holds the description of the video. If no description is entered and the user clicks the Upload button, the statement, "A description must be entered" is output.
We then create a line allowing for the file upload. If no file is entered, the statement, "Please choose a file" is output.
We then create a submit button, as pretty much every form needs. We give it the value, "Upload", so that Upload appears on the button. If not, it would just have submit by default.
We then close the form.
This concludes the HTML needed for this page.
PHP Code
First Block of PHP Code
There are 3 blocks of PHP codes needed.
The first block is shown below.
This block is for uploading the file entered to the directory, where we will store the video, in this case this is the Uploads/videos/ directory.
So this code takes the file that the user entered. Once entered, we are able to find out the file extension of the file by looking for the "." in the file. What follows after this will be the file extension, such as mp4, webm, or ogg.
We also take the description that the user entered of the video and place it in the $description variable.
We specify the directory that we want the video uploaded to. In this case, it is the Upload/videos/ directory. If the user has clicked the Upload button without specifying a file, the statement, "Please choose a file" is output. If the user enters a file but it is not of the format, mp4, ogg, or web, the statement, "The file extension must be .mp4, .ogg, or .webm in order to be uploaded" is output. If the user enters a file and it is mp4, ogg, or webm, the file is uploaded to the directory we specified through the move_uploaded_file() function. This function creates a temporary name for the file upload and then permanently transfers the file to the directory we specify. The statement, "Uploaded" is then output.
This concludes this block of PHP code.
Second Block of PHP Code
The next block of PHP code inserts the data into the MySQL table for storage. These include the description of the video, the filename of the video, and the file extension of the video.
This block of code is shown below.
This block of code establishes connection to the MySQL database being used. This requires a user, password, host, database, and table name.
As stated above, a MySQL table was created with phpMyAdmin. This table has 4 columns: ID, description, filename, fileextension.
If the description text box is not empty, then we insert into the Videos MySQL table the description, filename, and fileextension of the video.
We then close the database.
Third Block of PHP Code
The next block of PHP code displays the table with the video description and actual video.
So again, we establish connection to the MySQL databas which contains the Videos table.
We query the table containing the video information.
We then display the table with the html <table> tag.
The statement, while ($row = mysql_fetch_array($result)) gives a loop so that every row in the accounted for. As long as there are rows, the statement, mysql_fetch_array($result) will be true, so the loop won't be exited until all rows are output.
Using the $row['value'] feature, we are able to get all of the information from each of the columns for each row. So we obtain the description, filename, and file extension for each row, which represents a video.
And this concludes all the code which is necessary for building a video uploader which works in combination with MySQL to store tables of videos.
And this is how videos can be used with MySQL to hold a table containing videos.
Note that the video you uploaded is public, which is how you were able to access the page. If you didn't think it
would work and you uploaded an embarrassing video or one you just simply don't want on the site, just email me and I'll take it
down. I'll be checking regularly anyway to see if any offensive videos have been posted. Guys, please keep the videos clean.
Any violent, offensive, or pornographic videos will be taken down. Thank you for all cooperation.
Related Resources
How to Insert Images into a MySQL Database Using PHP
How to Insert Files into a MySQL Database Using PHP
How to Create a Video Manager Using PHP & MySQL
How to Select a Table from a MySQL Database
How to Create a Confirmation Page for an HTML Web Form Using PHP
How to Redirect to Another URL with PHP
How to Create a Search Engine Using PHP
How to Upload Images to a Website Using PHP
How to Upload Files to a Website Using PHP
How to Create a Searchable Database Using MySQL and PHP
How to Search a MySQL Table For Any Word or Phrase Using PHP
How to Create Your Own File Transfer Protocol (FTP) For Your Website Using PHP
How to Create a Register and Login Page Using PHP