
How to Label Objects in an Image in Python using OpenCV

In this article, we show how to label objects (or contours) in an image in Python using the OpenCV module.
OpenCV is very dynamic in which we can first find all the objects (or contours) in an image using the cv2.findContours() function.
We can then label these images wherever we want, because OpenCV has functionality to find the positions of these contours.
We can then add text to these contours in these images.
In our example code, we're going to label each object in the image by size, labeling the images from largest to smallest by numerical value.
1 will be the largest contour, 2 will be the second largest contour, etc.
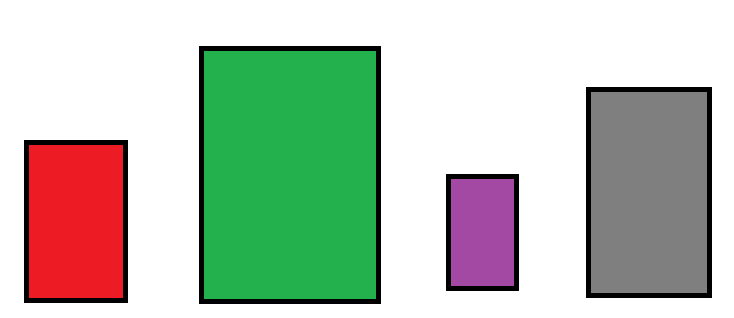
In this example, we will work with the following original image below.
After we run our code below, this will produce the following labeled image.
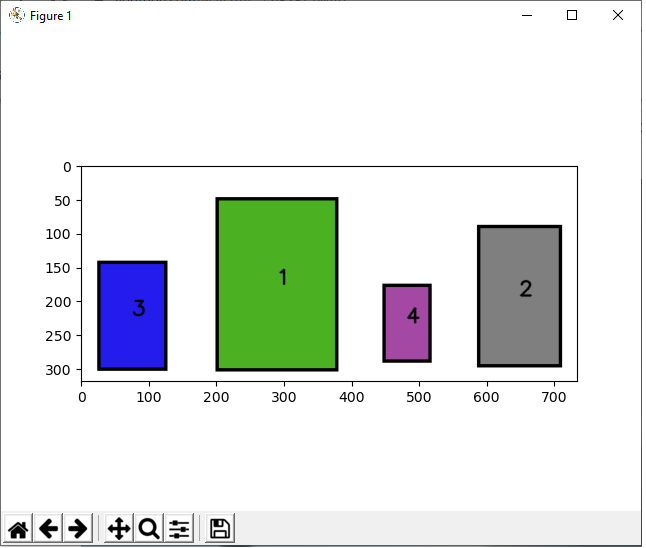
This is the code below that adds text to the center of each contour in an image,
labeling them by size from largest to smallest.
Let's now go over this code.
First, we import OpenCV using the line, import cv2
Next, we read in the image, which in this case is, Containers.png
We create the variable, original_image, to store the original image that will undergo modification throughout the code.
We create a grayscale version of the image and then find the Canny edges, which helps simplify the image for cvs.findContours() function. The cv2.findContours() function finds all external contours in our image, which finds the unique objects in an image.
We then sort these contours with the sorted() function by area using the key, cv2.contourArea. We put reverse=True so that the list is sorted from largest to smallest.
We then create a for loop that allows us to go through these items in the sorted_contours list.
We then calculate the position of the centers of each the contours. We do this by first finding M, the moments. By using the moments, we can compute the centers of the images using the formulas shown.
We then use the cv2.putText() function to put text into the contours of the image in the center of each contour. Since i begins at the 0 index, in order to show its the largest item, we add 1 to i to get a value of 1. c represents each of the contours in the sorted_contours list.
This places the text in the center of each contour.
Now we will add the text to the top middle of each contour to show that we can place text anywhere.
This produces the following image below.
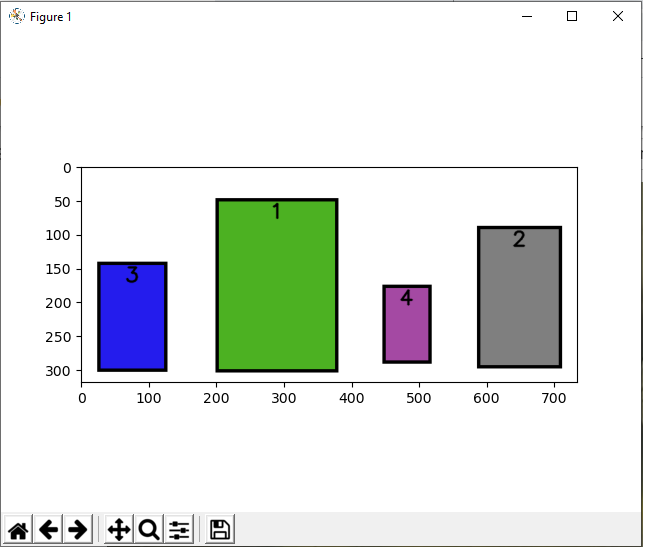
The code to create this is shown below.
The only thing that changed is the putText() function, specifically the org attribute.
Instead of placing the text in the middle of the y coordinates, we place the text 30px below the y
attribute, placing them at the top. We also place the x attribute 10px back from the center, which
actually makes it more centered.
One last modification is we will now place the text at the bottom middle of the image.
This produces the following image below.

The code to create this is shown below.
We now changed the y coordinates to y+h-30, which places it near the bottom.
So this shows how we can add text to any contour in an image at any place.
And this is how we can label objects in images in Python using OpenCV.
Related Resources
How to Draw a Rectangle in Python using OpenCV
How to Draw a Circle in Python using OpenCV
How to Draw a Line in Python using OpenCV
How to Add Text to an Image in Python using OpenCV
How to Display an OpenCV image in Python with Matplotlib
How to Use Callback functions to Connect Images to Events in Python using OpenCV
How to Check for Multiple Events in Python using OpenCV