MQ-7 Carbon Monoxide Sensor Circuit Built with an Arduino

In this project, we will go over how to build a carbon monoxide sensor circuit with an arduino.
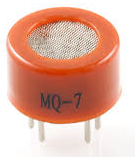
The carbon monoxide sensor we will use is the MQ-7 sensor. This is a sensor that is sensitive to effects of CO.
Carbon monoxide (CO) is a very dangerous gas which is odorless, colorless, and tasteless, so it cannot be smelt, seen, or tasted. A person really would have no idea that they are breathing in CO besides the fact that they would start to feel horrible. The most common symptoms of CO poisoning is headache, nausea, vomiting, dizziness, fatigue, and a feeling of weakness. Neurological signs include confusion, disorientation, visual disturbance, syncope, and seizures.
Carbon monoxide is produced from the partial oxidation of carbon-containing compounds; it forms when there is
not enough oxygen to produce carbon dioxide (CO Carbon monoxide poisoning is the most common type of fatal air poisoning in many countries. Being colorless,
odorless, and tasteless, it is very hard to detect but highly toxic. Carbon monoxide is absorbed through
breathing and enters the bloodstream through gas exchange in the lungs. CO combines with hemoglobin to produce
carboxyhemoglobin, which usurps the space in hemoglobin that normally carries oxygen, but is ineffective for delivering
oxygen to bodily tissues. This leads to oxygen deprivation, which can be deadly.
CO is measured in parts per million (ppm). To give you some perspective, the natural atmosphere is composed
of 0.1ppm. Ther average level in homes is 0.5-5ppm. The level near properly adjusted gas stoves in homes and from modern
vehicle exhaust emissions is 5-15ppm. The exhaust from automobilies in Mexico City central area is 100-200ppm. The amount of
CO that can be created from the exhaust from a home wood fire is 5000ppm.
Concentrations as low as 667ppm may cause up to 50% of the body's hemoglobin to convert to
carboxyhemoglobin. A level of 50% carboxyhemoglobin may result in seizure, coma, and fatality.
In the United States, OSHA limits long-term workplace exposure levels above 50ppm.
According to the Florida Department of Health, every year more than 500 people in the United States die every
year from accidental exposure to carbon monoxide and thousands more across the US require emergency medical care for non-fatal
CO poisoning. These products include malfunctioning fuel-burning appliances such as furances, ranges, water heaters, gas
and kerosene room heaters, fireplaces, and charcoal that is burned in homes and other enclosed areas. Still others die from
CO produced by non-home products, such as cars left running in a garage. The Centers for Disease Control and Prevention
estimates that several thousand people go to hospital emergency rooms every year to be treated for carbon monoxide poisoning.
Carbon monoxide can be measured through laboratory testing requiring a blood sample (arterial or venous)
and can also be analyzed on a CO-oximeter.
Having this overview of carbon monoxide gives some background to how it is created and the real severe dangers it can pose.
It creates context to just how important it is to be able to detect and measure the amount of CO that may be present in the environment during any given time.
Knowing this, let's go to building our carbon monoxide sensor circuit.
Components Needed The MQ-7 can be obtained very cheaply, just a few bucks. A good place to look for it is on ebay, which always has auctions on them for the $2-$3 range.
Important, it is recommended that you do not obtain the standalone sensor but the whole MQ-7 board. This is because if you buy the standalone sensor,
you will have to finish building the whole schematic before you can connect it to the arduino. So that less work is required for integrating it
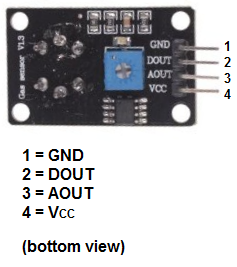
with the arduino, it is recommended that you buy the complete MQ-7 sensor circuit. This you can see below.
If you buy the complete board, there are 4 leads which need to be connected.
There 4 leads are +5V, AOUT, DOUT, and GND.
The +5V and GND leads establishes power for the alcohol sensor.
The other 2 leads are AOUT (analog output) and DOUT (digital output).
How the sensor works is
the terminal AOUT gives an
analog voltage output in proportion to the amount of carbon monoxide the sensor detects. The more CO it detects, the greater the analog voltage
it will output. Conversely, the less CO it detects, the less analog voltage it will output. If the analog voltage
reaches a certain threshold, it will send the digital pin DOUT high. Once this DOUT pin goes high, the arduino will detect
this and will trigger the LED to turn on, signaling that the CO threshold has been reached and is now over the limit. How you can change this
threshold level is by adjusting the potentiometer to either
raise or lower the level.
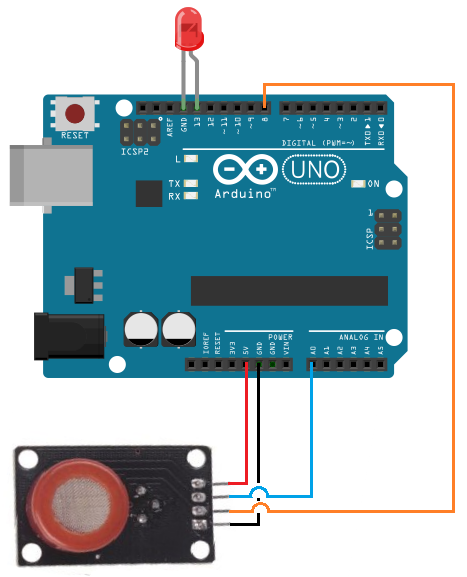
The carbon monoxide sensor circuit we will build with an MQ-7 sensor integrated with an arduino is shown below.
The connections are pretty basic.
To connect the sensor, there are 4 leads. 2 of them are for power. The +5V terminal of the sensor connects into the
5V terminal of the arduino board. The GND terminal of the sensor connects into the GND terminal of the arduino. This establishes
power for the sensor.
The other 2 connections are the analog and digital output of the sensor. These connect to analog pin A0 and digital pin D8, respectively.
The code which we need to upload to the arduino so that it can measure carbon monoxide levels is shown below.
The first block of code defines all the pin connections of the sensor and the LED. Since the AOUTpin connects to analog pin A0, it is initialized to 0. Since the DOUTpin connects
to digital pin D8, it is initialized to 8. Since the LED connects to digital pin D13, it is initialized to 13. 2 variables, limit and value, are also declared. These will be used to store the value
of the
analog pin AOUT and digital pin DOUT.
The next block of code sets the baud rate and declares the DOUTpin as input and the ledPin as output. This is because the sensor is an input to the arduino for the arduino to
read and process the sensor value. And the LED is an output will serves an indicator if the sensor has detected alcohol.
The next block of code reads the sensor pin AOUT and stores the value in the integer value. It also reads the sensor pin DOUT and stores the value in the integer limit.
We then print the alcohol value, which will be a numeric value ranging from either 0 (no alcohol detected) to 1023 (maximum level of carbon monoxide that can be read). We will aslo print the limit which
will either be HIGH or LOW. If the CO detected is under the threshold level, the value of limit returned will be low. If the CO detected is above the threshold, the value of limit
returned will be HIGH.
If the value is HIGH, the LED will turn on. If the value is low, the LED will remain off.
Related Resources
How to Use the LM741 Op Amp as a Comparator

MQ-7 Carbon Monoxide Sensor Circuit Schematic

Code
const int AOUTpin=0;
const int DOUTpin=8;
const int ledPin=13;
int limit;
int value;
void setup() {
Serial.begin(115200);
pinMode(DOUTpin, INPUT);
pinMode(ledPin, OUTPUT);
}
void loop()
{
value= analogRead(AOUTpin);
limit= digitalRead(DOUTpin);
Serial.print("CO value: ");
Serial.println(value);
Serial.print("Limit: ");
Serial.print(limit);
delay(100);
if (limit == HIGH){
digitalWrite(ledPin, HIGH);
}
else{
digitalWrite(ledPin, LOW);
}
}
How to Build an LM339 Quad Voltage Comparator Circuit
How to Build a Dark-activated Switch
How to Build a Hall Effect Sensor Circuit
How to Build a Touch Sensor Circuit
How to Build an Accelerometer Circuit
How to Build a Motion Detector Circuit
How to Build a Motion Detector Alarm Circuit
